Showing posts with label organization. Show all posts

Door Organizer

This product from Canyon Adventure Vans ("The Doorganizer") works well on the rear doors for small items. It was an easy 15-minute installation, and is handy for items that I frequently need from the rear of the van.


7-June-2022

Paper Towel Restraint

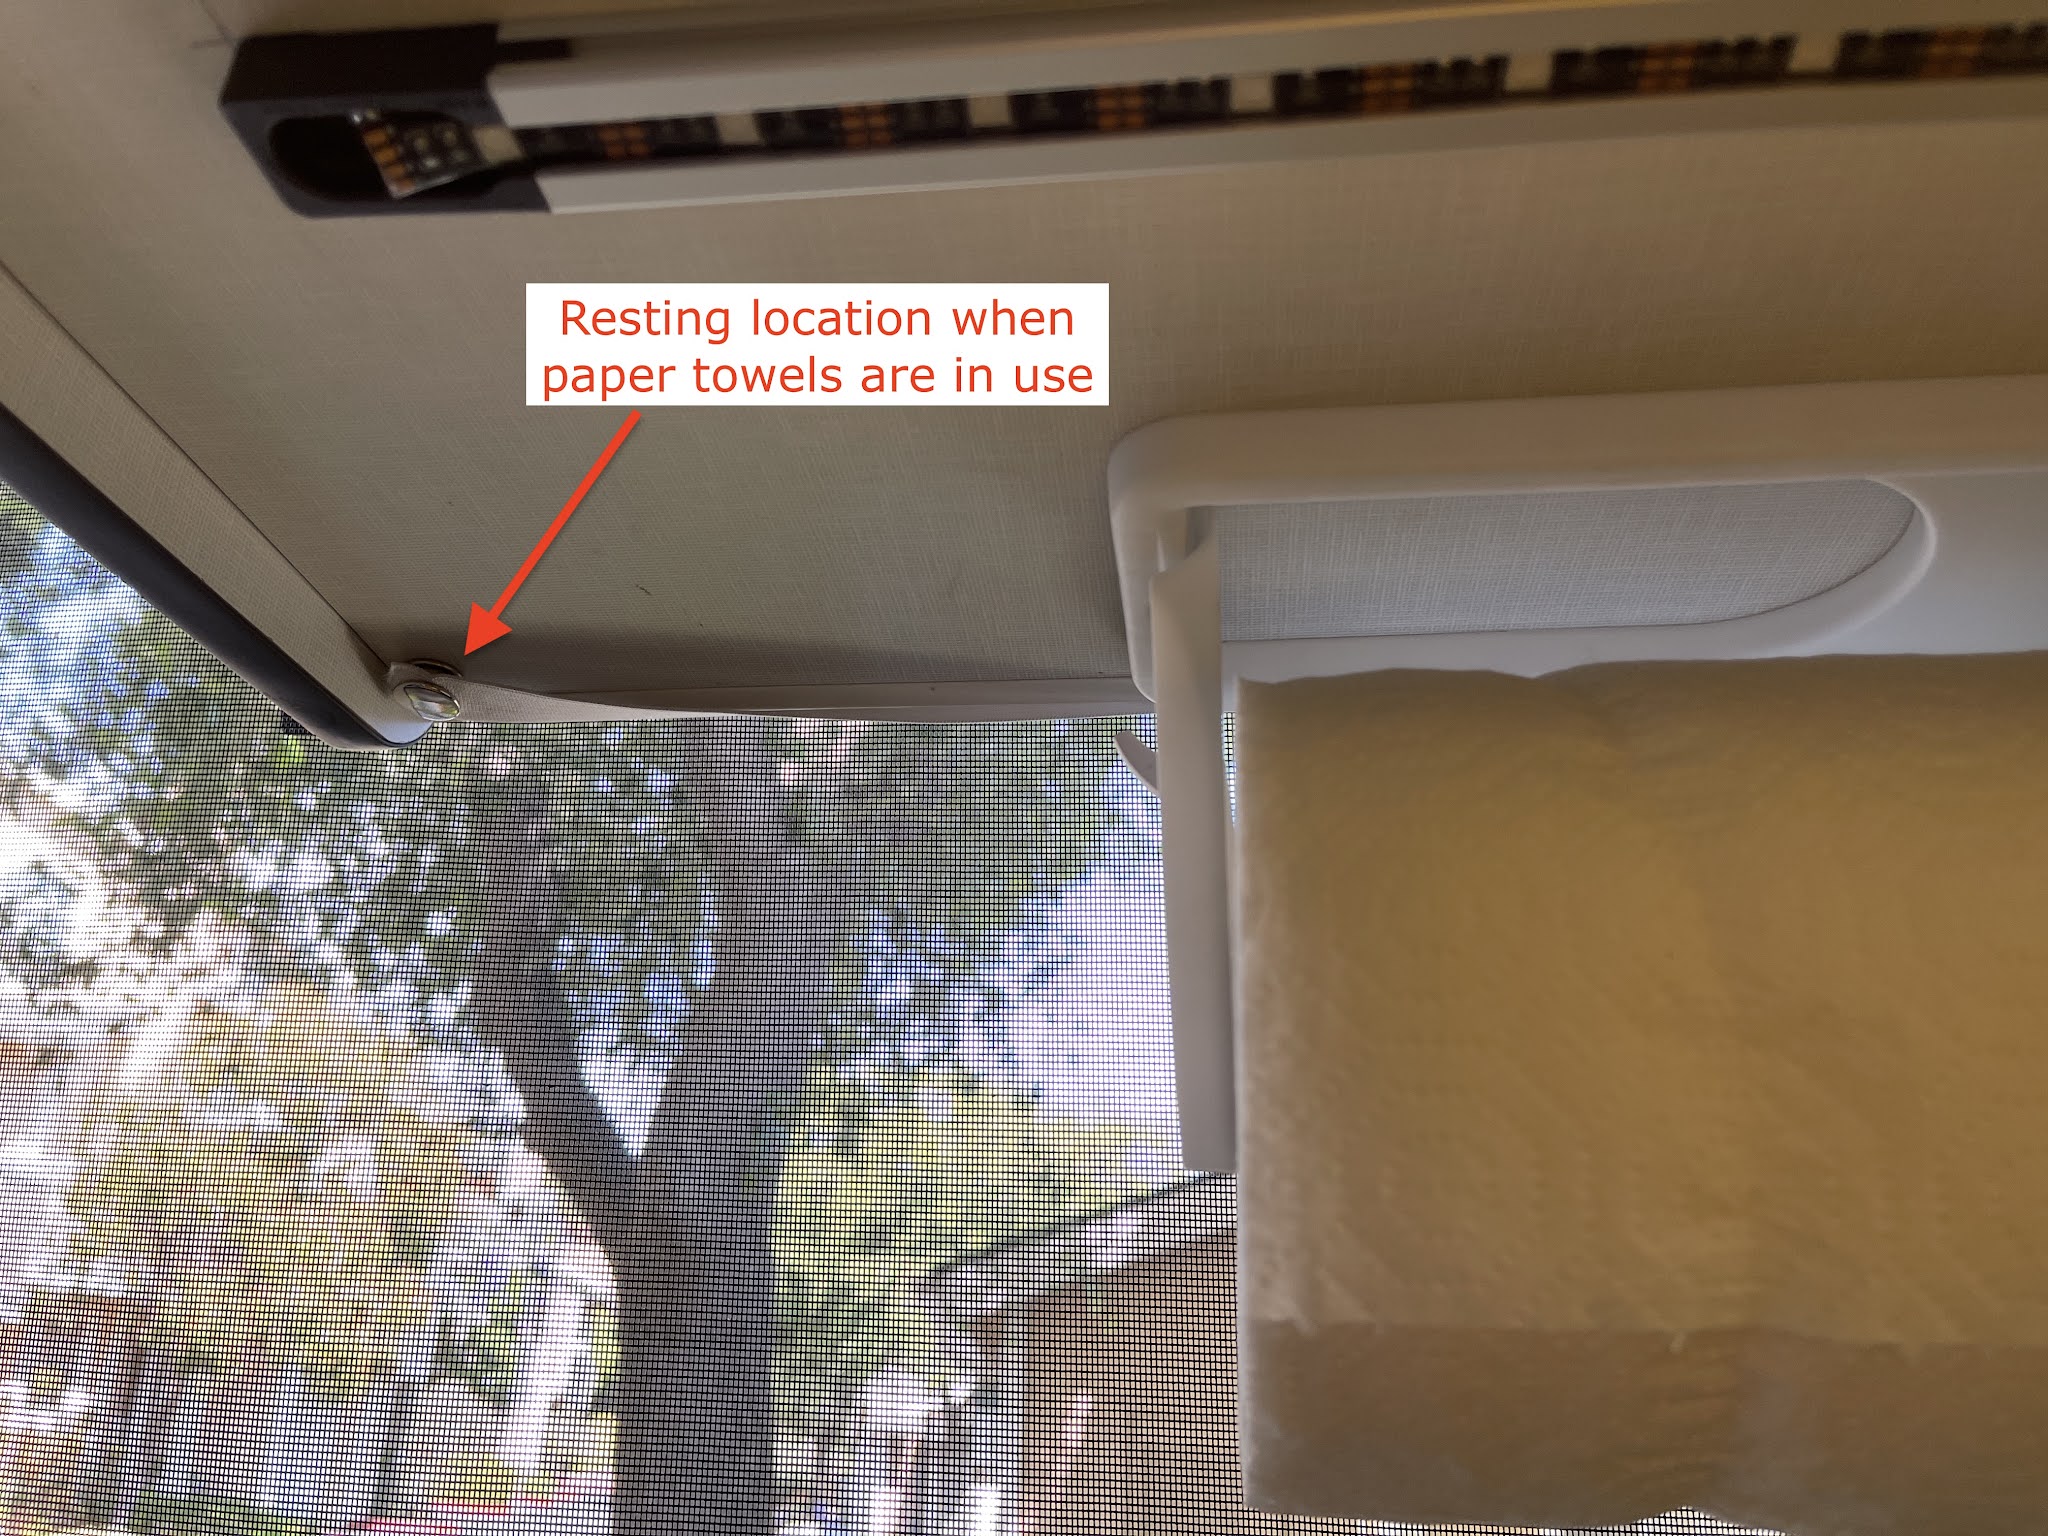
Our paper towel dispenser sometimes catches the wind from the windows and unspools the towels across the back of the van. We wrapped a rubber band around the roll for several years, but that proved to be suboptimal. I finally landed on this solution.

I took a piece of 1" wide elastic, about 12" long, and installed a female snap on each end. 


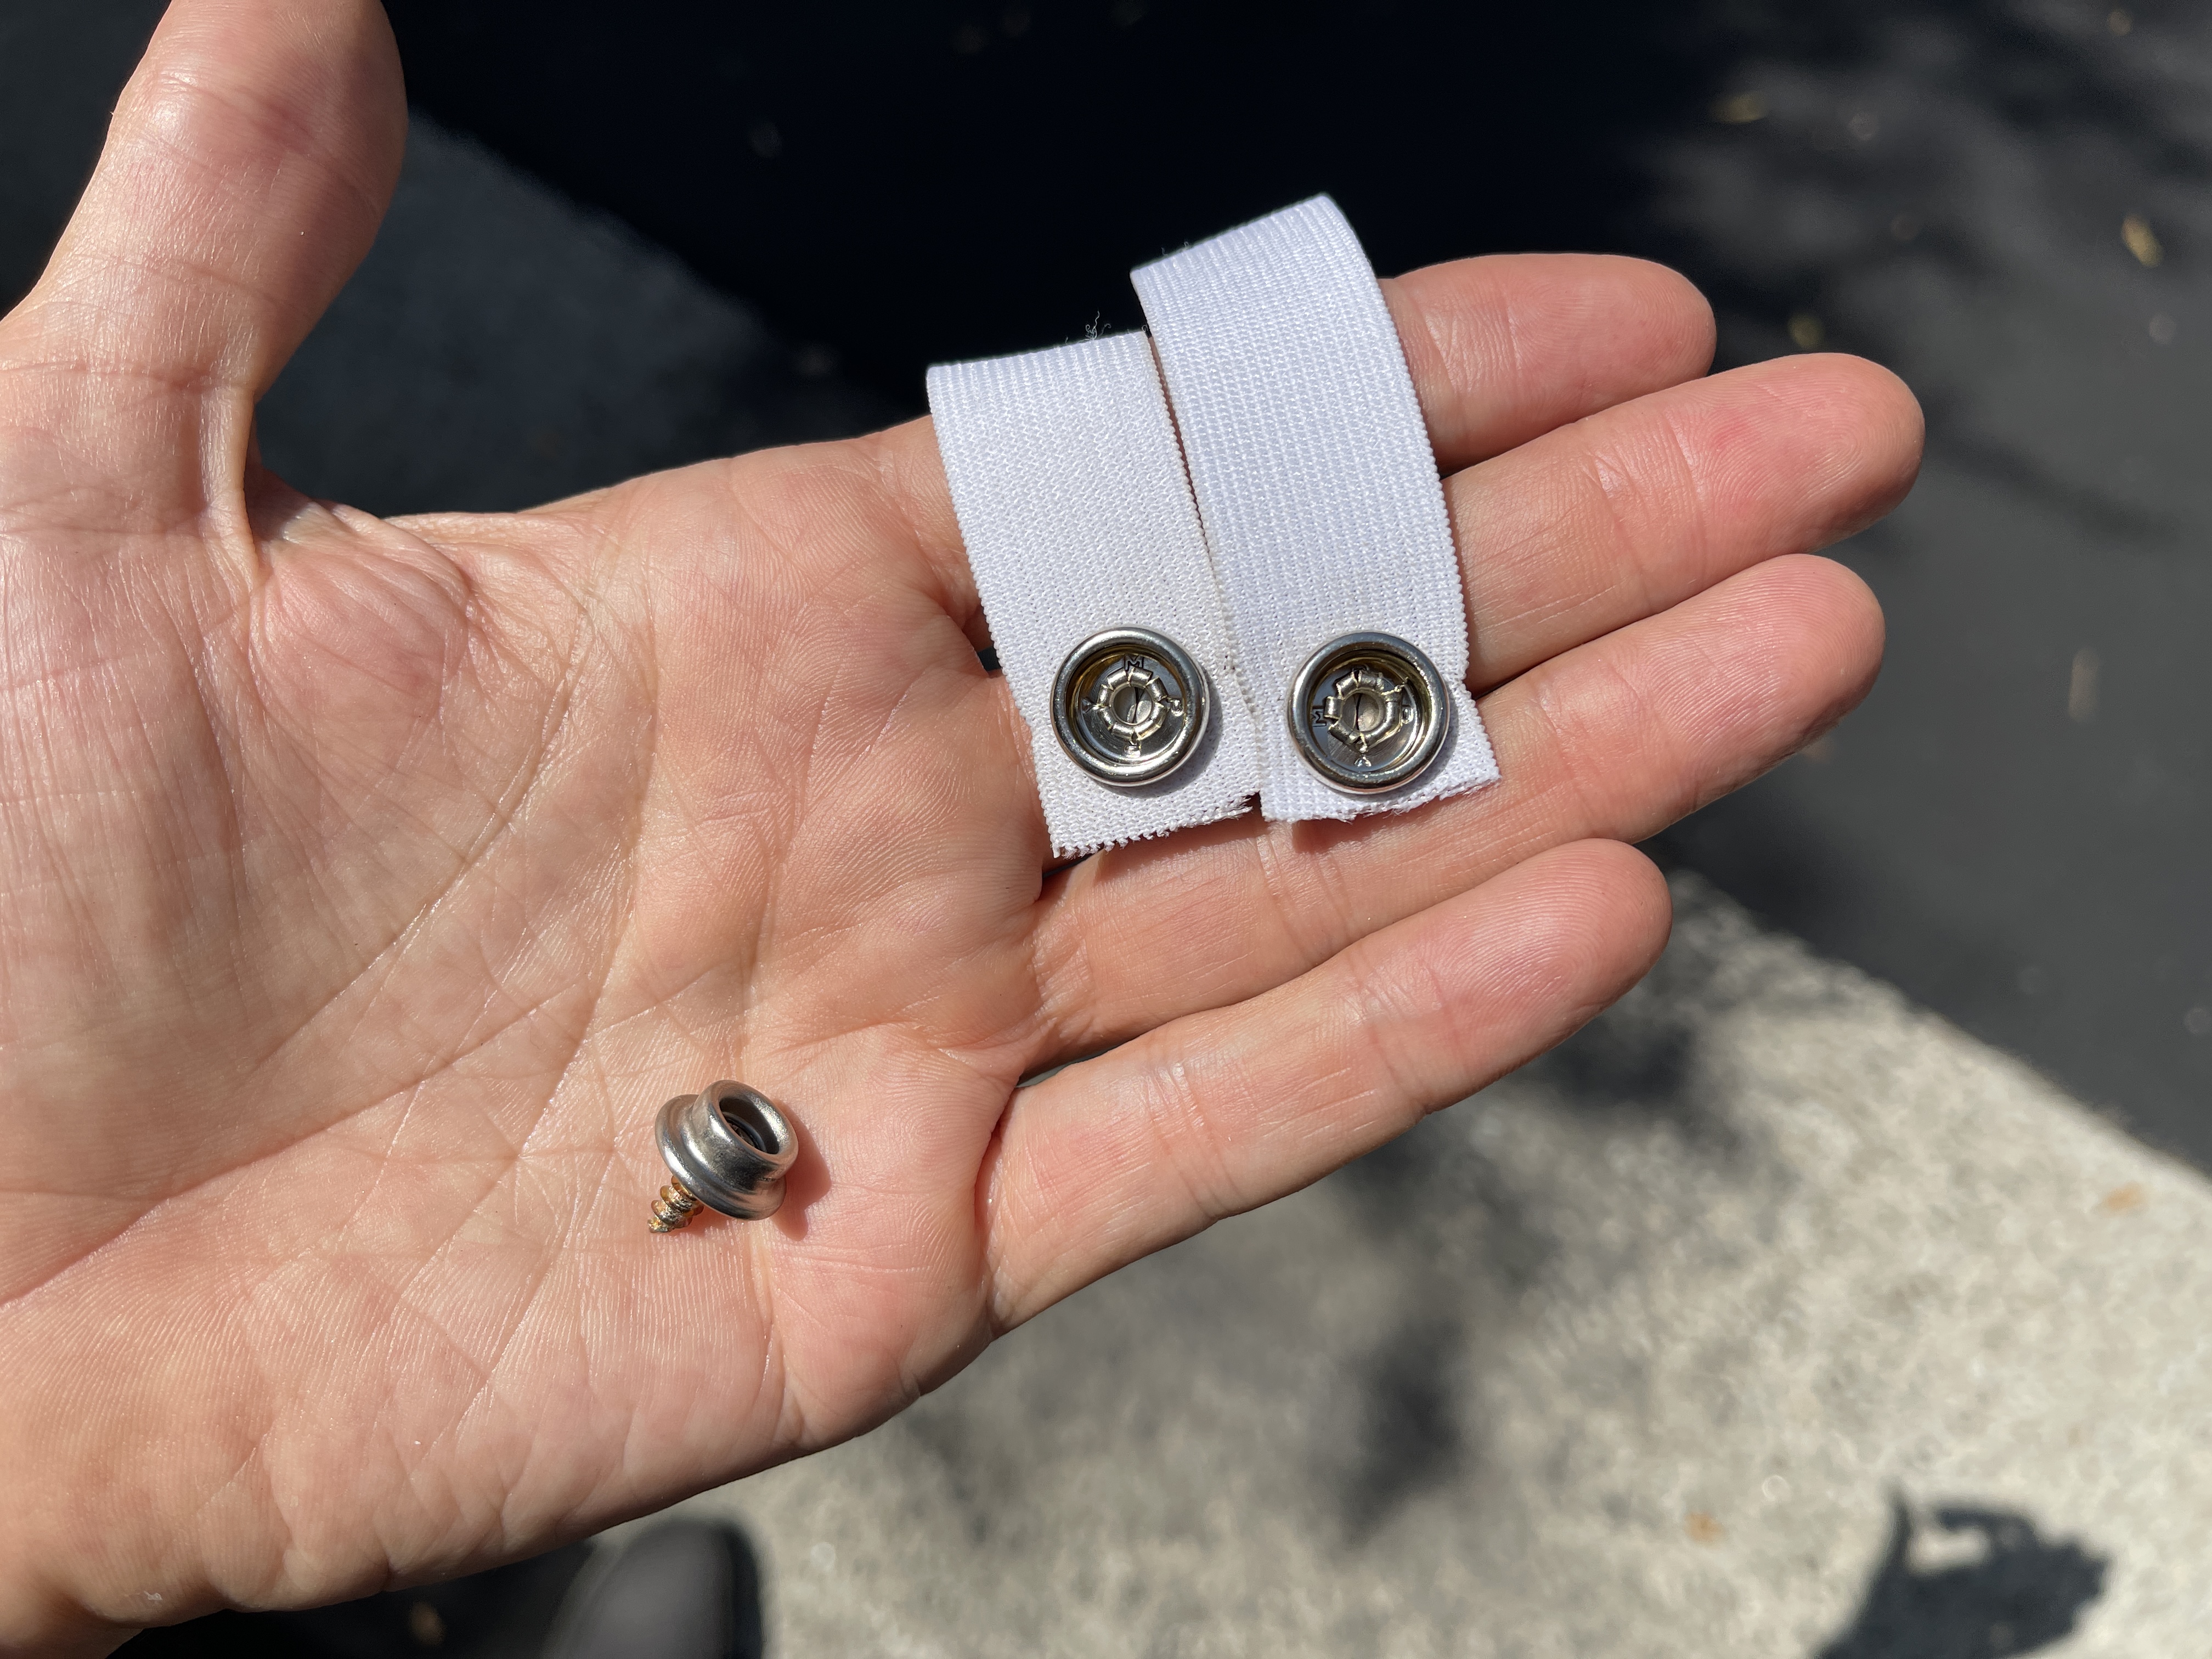
I attached male snaps to the cabinet in the locations shown below.


One advantage of using elastic for this purpose is that it accommodates whatever size the paper towel roll happens to be. We'll try it for a while and see how it works out.


24-July-2021

Storage Pocket

We needed another small storage pocket in the bedroom for storing glasses, chapstick, etc, and were happy to find this this handy unit from Amazon. It clears the bed when it raises & lowers. I just used some double-sided VHB tape, and it holds perfectly.


13-Oct-2020

Storage Bags in the Rear Wheel Wells

If you have a 2018-20 Revel, and if you're *not* doing a GLSS from Canyon Adventure Vans, then you have unusually-shaped rear wheel wells in the garage area. I've searched a long time for a better way to use the space in these rear wheel wells, so I was very glad to finally find these Jeep storage bags that fit that space almost perfectly. (Note that there is a driver's side bag and a passenger's side bag, and they differ slightly from each other.)


In order to mount the driver's side bag, I considered using expansion nuts, but found these machine screws to have a very firm hold in the plastic, and simply capped them with large black washers, shown below.


I anchored the lower right corner (red circle) first, then applied 3 more screws & washers along the lower rear seam (blue line). Then I pulled the bag up so that it was vertically taut, and applied 4 more screws & washers along the top (green line). 


At this point, the bag was very firmly attached to the van, and I stopped there. Looking into the bag without the velcro dividers installed, it looked like this:


The bag measurements are these, yielding 1850 cubic inches of storage in a padded, zippered bag.

To my great surprise, I am able to put the entire contents of my emergency supplies and water replenishment totes into this bag, freeing up the space on the garage floor for other gear. Everything in the following photo fits in this bag.


I'm keeping it zippered shut, and will continue using my cargo net over this space for eventualities.


UPDATE: I realized that if I turn one of these bags on end, it provides a good fit in the remaining space in the wheel well. I've loaded it up with shoes & boots, and will give it a try on our next road trip. That awkwardly-shaped space is really starting to get utilized efficiently...


20-Oct-2020


Toolbox & Emergency Supplies

Some people have asked about the tools that I carry on the road with me for road trips. This is the minimal set of tools that will fit into this 12" toolbox. After 3 years of driving this van, I haven't had a problem yet that couldn't be solved with what you see here.

A: Hose clamps for pinching off the Espar line if it ever has trouble starting. Never had any problems with the Espar, but some have, so this is just in case...

B: Tool for manually raising & lowering the electric bed.

C: Offset screwdriver, so handy for the van's tight spaces.


In addition to that toolbox, I keep a set of emergency/backup supplies & hardware stuff. Items that you may not be able to identify from the picture are:

D: Folding metal shovel
E: 12 volt air compressor
F: Spare parts for the Espar heater
G: Water Bandit for pesky spigots
H: Water funnel for gravity fill when no hose is available
I: OBD II reader for Sprinter error codes (and resetting them)
J: Lug wrench for Method wheels


19-Oct-2020

Sink Organizer for Gloves

I use cleaning gloves for doing the dishes, and they're frequently in the way when I'm not wearing them. So I bought some bulldog clips that I could attach to the sink cover with a single wood screw.  Works great, doesn't impede the sink, and folds away when we close the lid without having to do a thing.


Aug-01-2020

Daytripping vs. Roadtripping

The Covid pandemic has us using our van a bit differently for the past four months, and it's caused us to make some changes to how we organize our van. Rather than taking long road trips, overnighting with a lot of gear, we're mostly doing day trips, not taking much gear at all, and using the garage differently.

This is our normal roadtripping mode, with all the gear that we need for weeks at a time, organized and labeled in totes.

We don't need most of that gear (water replenishment, tools, many changes of footwear, campfire materials) when we're on a day trip to the beach or mountains, so I pulled almost all of that gear out of the van. Taking a cue from the fabulous Canyon Adventure Vans' GLSS, I replaced it with a couple of comfortable folding chairs and a camping table, giving us the daytripping configuration shown below. This gives us another 'room' to dine in, watch the whales out the back, whatever. 

However, if you're in a place where you need to use the insect screens, and you have the excellent Rolef screens on your van, then your view is blocked because the lower panel of the screen is opaque. Bummer, dude.

So I used one of the old-school Revel screens from model years 2018-19 to give us floor-to-ceiling views. This works great, and we love the screened-in porch vibe.

It was a little tricky to attach the Winnebago screen to the Rolef screen, and I had to make some stuff. Here's what I did...

I wasn't going to uninstall the Rolef screen just for day trips, so I needed a way to attach the Winnebago screen to it. Since the Winnebago screen only offered snaps for attachment, I made 'velcro snaps' to solve the problem.  I cut 1" x 1" squares of plastic by cannibalizing a Flexible Cutting Mat, then attached snaps to them. Then I attached some self-adhesive velcro squares, yielding what you see below.


Then I attached velcro squares to the Rolef screen, shown below. Works great, no bugs, floor-to-ceiling screened-in porch for the pandemic.


May-2020

Bottle Hook

I sometimes need to get a drink in the middle of the night, but I sleep near the back door, and there's no good place to store my water bottle. I decided to repurpose one of the snap screws as a way to anchor a hook for my water bottle. 

I used a 'rope hook' and a #8 1 1/2" self-drilling screw, costing about $2.00.


Update 2020:
This was a big success, so my wife wanted one on her side. I used a slightly smaller hook (https://smile.amazon.com/gp/product/B000BQMUJ2/) and reused one of the holes from the 'bed seat belt' that I had removed.  Works great.


Dec-19-2019

More Storage with Nets and Elastic

My wife is always looking for a better place to store her iPad while driving, so I added a cargo net to the side of the passenger seat. It was easy to install, but it did require drilling two small holes through the steel base of the seat (I used strong zipties in the upper corners). The net I used was this one.


I also added a few elastic straps to the galley cabinet for restraining our coffee cups and a small bamboo cutting board.


Organizational System for Our Gear

The Revel doesn't have much built-in storage, and we like to stay very organized in a small van, or things get chaotic and unworkable very quickly. In other words, we're 'everything must have its place' people. Here is what we've done to keep ourselves organized -- this is basically how we roll after fine-tuning it for a few months.

We are not adventure sports people (although we admire them!), so we don't have climbing gear, kayaks, etc. Instead, we do 'backroad/offroad touring', usually with our bikes on a rack behind us, and our gear reflects that. This is basically how we make camp every night (scene from breakfast at Joshua Tree in January): zero-gravity chairs for campfires and star-gazing, and a folding table for meals and miscellanea.


We keep the bedding on the bed, and just raise the bed everyday so that we have access to the garage, and the bedding stays clean and tidy. 


All of our gear is organized into tubs. From left to right: 

  • Lower left grey tub is for the water resupply, like water hose and filter, gravity pour spout, funnel, water bandit, etc. 
  • Upper left grey tub is for pantry and household sundry overflow, like garbage bags, extra paper towels, ziplocs, laundry soap, extra boxed/bagged food.
  • Lower blue tub in the middle is power cord, large toolset, jumper cables, emergency equipment, extension cords; 
  • Upper blue tub in the middle is footwear: boots, shoes, flip flops; 
  • Black tub is firewood, firestarter, kindling, hatchet, gloves, marshmallow forks for smores, and other campfire stuff;
  • Lynx Levelers and Dustbuster (it has found a home since this picture was taken);
  • Outdoor zero-gravity chairs and outdoor folding table. 
I have not used a single bungee cord — the carpet in the back keeps everything from slipping. And there are labels on everything, which gives us inner peace, dammit.


Looking at the back row of garage:

  • On the right we have two grey tubs that serve as our 'clothes closets'; these are his & hers tubs, and they hold about 10 days worth of clothes in an organized fashion.
  • Just above them is a tub full of full water jugs for drinking; until we’ve had a chance to sanitize and install a water filter on the line, we are carrying drinking water. This is not sustainable, and we will not keep buying/hauling jugs of water in the near future.
  • On the left is the cargo net, which holds all of our exercise equipment for daily exercise: yoga mat, weights, resistance bands, tarp for outside exercise, and small ball.


Nightstand Pockets

We've really missed having some sort of 'nightstand' on either side of the bed for all the normal stuff: kindles, chapstick, kleenex, etc. 

We decided to install some sort of cargo pockets on the wall above the bed, and decided that it should have a rigid frame, no adhesive, and accommodate enough stuff without ripping out of the wall. I found these things on Amazon, and they came to us from Germany (took a couple of weeks to receive them).


I was extremely concerned about putting holes in the wall near the flares, because the flares are made of fiberglass. Also, it was unclear to me if the plastic 'shell' that surround the whole garage would be strong enough to hold screws & weight.  After taking some measurements of the plastic and the fiberglass, I settled on these screws, and they worked perfectly, staying away from the fiberglass. If you do this, I highly recommend these screws (7x1/2" flathead), but don't over-tighten them, or you'll lose your grip in the plastic!


The pockets work very well, and are rock-solid, no danger of them falling off the wall at all.


2020 Update


This system continues to work well, but we added yet more storage with this pocket, ideal for holding iPads and similar. Once again, I used simple screws in the plastic walls, and there have been no problems at all with it.