Showing posts with label disassembly. Show all posts

Ceiling Fan Repair

One of our MaxxAir 8501K ceiling fans recently started making a banging noise and was unable to fully raise the lid. After looking into it a bit, it became clear that the operating mechanism (part number 10A20281K-1AF) had broken, which is apparently a fairly common problem. I was able to get replacements for both fans (one kept in reserve) through Panther RV Products. (Pro tip: find the model and serial number for your fan under the screen cover - - remove the screen and you'll see a paper label affixed to your fan on the inside.)

The replacement took about 30 minutes, following their short instruction manual, and is somewhat greasy due to the operating mechanism itself.


8-Feb-2022

Removing the Ceiling Headliner

I've been chasing a roof leak, and needed to pull the ceiling headliner down in the front of the van. Here's how I did it.

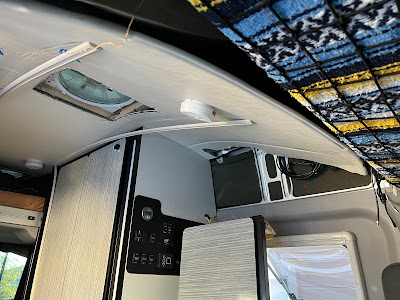
There are essentially 3 pieces keeping the headliner up in the front of the van, as shown below - - the dinette cabinet, a 'pinch' retainer bracket, and some trim over the sliding door. For the first item, see my blog post about how to remove the dinette cabinet.


Removing the two trim pieces over the sliding door is very easy, just a few self-drilling screws to remove.


The pinch bracket holds up the entire front of the headliner, and it vexed me. Based on the way it is built, it seems that Winnebago installs this bracket first, then slides the entire headliner forward into this pinch point when the van is empty. I couldn't remove everything in the van, so I resorted to brute force. 

There are three pieces to mess with. The arch trim is attached to a long piece of wood with two wood screws, and the wood is attached to the pinch bracket via an unknown method (glue?). I used a large screwdriver to pry the arch trim from the wooden piece just a little bit so that it introduced some play ('wriggle room') into the assembly. This wriggle room was enough to pull the headliner out of the pinch bracket, thus dropping the entire headliner in the front of the van. Note that the headliner is not glued or in any way attached to the pinch bracket, it just sits in the pinch slot, and the bracket keeps it from flopping down.


After removing some screws in the headliner's track lighting, the entire headliner bends down and you can access the roof. In my case, I did this so that I could find the source of a roof leak on the front passenger side.


After pulling down the copious foam insulation that's attached to the roof, the bare metal is exposed, and you can see what you're dealing with. For me, it was useful to examine the roof rail screws and the rivnuts that Winnebago installed for mounting the awning in its factory location. (My awning has been moved from the factory location and I needed to make sure that these points weren't leaking).


To put it back together, I just did everything in reverse order, although I found that it took two people to get the headliner seated properly in the pinch bracket. No visual damage was done, it all looks original and untouched.


20-December-2021

Removing the Dinette Cabinet

I needed to remove the dinette cabinet so that I could get behind the ceiling headliner. I found that it's easy to remove it, but harder to put it back up. Here's how to do it on a 2018 Revel.

After removing the inside of the cabinet ('floor' of the cabinet is a separate piece, and the back & 'ceiling' of the cabinet are a single folded piece) with regular screws, you're faced with 8 screw locations that are holding the cabinet to the ceiling and wall.  An overview photo is the following:


The 2 screws that attach to the shower wall are here.


The three screws that attach to a metal bracket above the headliner ceiling are here.


Three screws attach to the driver's side wall here.


Here's where the wall screws attach through the cabinet (one of three screws shown).


Reattaching the cabinet is a good job for two people - - it's a bit tricky to lift the cabinet, get the holes lined up, and tighten it all by yourself. Make sure that you're on good terms with your helper, because you'll be swearing a fair bit. 


20-December-2021

Bench Rotation and Battery Upgrade

Ralph Hill from the Revel group on Facebook has created a detailed description of rotating the bench seat and installing a new lithium system in his 2018 Revel. Download the full document here. (Link to Facebook post is here).

Well done, Ralph, and thank you!


Disassembling the Bench & Shower

I thought these were some fascinating photos, included here for reference.


17-October-2020

Stabilizing the Window on the Sliding Door

Many Revel owners have noticed that there is excessive rattling and instability in the large window in the sliding door.  This is primarily because the stabilization ribs for the door have been removed by Winnebago to make room for the window, leaving the window attached ONLY to the thin metal skin on the door. The red lines, below, show where the support ribs were.


In order to improve this, I followed examples from Facebook Revel members Ralph Hill and Jason Vigil to create structural ribs that connect the window to the structural supports in the door.  This is an illustrated guide for doing that.

  • Time: 3 hours
  • Cost: $25
  • Tools: Philips screwdriver, hacksaw, drill
  • Materials: Angle aluminum (see below), silicone glue, 10 wood screws


Remove the plastic end caps from the window blind frame and remove screws behind them.

You may need to use an offset screwdriver to access the lower right corner.

Remove the screws from the four inner corners of the window blind.

Remove the 4 screws holding the grey plastic panel to the door frame.


I bought 2 pieces of angle aluminum shown below.

I measured approximate lengths of 26.5" and 25.5" for the front and rear ribs, and cut the aluminum to fit. After repeated placements and adjustments, I was able to cut each of the grooves shown here with a simple hacksaw.

The angular cut shown below is to accommodate the grey plastic panel when it is reinstalled.


Repeatedly making small cuts and testing the fitment resulted in a tight, solid fit.


I used a black marker to determine where the screws would attach to the window, and drilled them out with a hand drill. I used 5 screws per window.


Yielding this as the final product. Time for installation.

Following others' suggestions, I applied a bead of silicone glue between the window frame and the aluminum support.


After mating the aluminum support to the window frame, I put 5 screws in each support, giving the final result here.


Note that the tolerances are fairly small. There was some concern about mating steel and aluminum, resulting in Galvanic corrosion. However, my neighbor happens to be a metallurgist, and he told me, "If you're dealing with mild steel (not stainless steel), then it's no problem. Aluminum and mild steel are very close on the Galvanic scale."


Jul-1-2020

Replacing Noisy Heater Fans

Early Revels (2018 and 2019) had noisy heater fans, very whiny and piercing, waking you up at night and making it sound like you're in a machine room. After reading in the Facebook group that Ralph Hill had replaced his fans with some higher quality & inexpensive aftermarket fans, I bought a box of the fans for about $18. They do not move quite as much air as the originals (about 15% less, I think), but they are nearly silent, and still push plenty of air.

At the recent California Revel Rally, Ralph Hill generously offered to replace the fans while Jim Lincoln and I watched & learned. These photos are incomplete and omit a few things, but they illustrate the major steps involved. Note: this is a kneepad job, so wear some!


Part 1: Dinette Fans


With the dinette seat and cover removed, you see the items in the following picture. You'll need to remove the 4 items shown with red X, including the central wooden brace that adds rigidity to the box.


The most dangerous part of the job is removing the orange power cable from the back of the inverter. It's got a lot of current going through it, so take care not to have any metal around, and insulate it with tape as soon as it's disconnected.


Remove the wooden brace to access the black box below it.


Opening the black box is a little tricky. First, remove the grills over the fan intake. The grills are held in place with plastic 'screws', and you pull them out using a prybar, like the teflon tools from a car trim removal kit. You can replace them with the metal screws that accompany the new fans, or you can re-insert the plastic screws that you removed.

The black box is a clamshell with a top and bottom half. To open it, you should use a flathead screwdriver to push in plastic tabs on the ends. When the tabs are pressed in, they release the top half of the plastic clamshell.


With the clamshell now opened, you can slide out the old fans and replace them with the new ones. Be sure to find the arrows on the fan showing airflow direction, and insert them with the correct orientation. Then you need to rewire the fans so that they have power going to them (sorry, no photos for this). 


Finally, you need to reverse your steps and put everything back together. Be sure to test your system before you reassemble, though!


Part 2: Garage Fans

The rear garage fans are easier to replace. To do this, you need to pull out the refrigerator by taking off its door, then removing 4 screws around the edge of the refrigerator, shown below with red circles. Slide the refrigerator to the Revel's garage and out of your way for a few minutes. 


This will expose an identical black box 'clamshell' that we saw under the dinette seat. Once again, remove the fan grills, press the tabs on the box to open it, and replace & rewire the fans as before.  Test it before you declare victory, then reverse your steps and reassemble the pieces.


Enjoy your new, quiet fans - - so much better than before, well worth $18! 

Many thanks to Ralph Hill and Jim Lincoln for sharing their time and expertise.


USB Upgrade & Nightlight

It's easy to upgrade Winnebago's factory-installed USB ports to provide faster charging (NB: for non-Apple devices!), and depending on which replacement model you select, you can get a nightlight with it, too.  I chose this model for about $16, and it took about 15 minutes to install. Here are the steps I took to replace the USB ports under the galley cabinet:


Remove the two screws in the USB port's faceplate.

Remove 4 screws inside the bottom of the dinette cabinet, along the front edge.

Use a flathead screwdriver to gently pry the bottom of the cabinet up. Notice that there are staples in certain areas, so you need to gently work them out as you lift the cabinet bottom 3 inches or so.

Pull the USB port down (gently), and notice that WHITE is NEGATIVE polarity in Winnebago's wiring here. Disconnect the wiring simply by pulling.

Put the new USB port in the original faceplate, attach the new USB port to the existing wiring (Yellow is +, White is -), and put the port back in the hole in the bottom of the cabinet.  Use the new USB port's lock ring (red arrow in the above picture) to tighten it against the cabinet.

You now have new, higher powered USB ports that indicate current voltage, and the LED provides a small night light. If you don't want the night light, then you can cover it with a small amount of nail polish. Thanks to Jim Lincoln in the Revel Facebook group for the part number and inspiration!