Angling the Front Solar Panel

Early Revels shipped without a fairing or air dam, so the leading solar panel caught a lot of wind and made a lot of noise. Several people in the Revel Facebook group ('Winnebago Revel 4x4') inverted the crossbeam and lowered the panel on the leading edge to improve the aerodynamics, and I finally got around to doing that.  Here's what I did...

After detaching the solar panel and removing the crossbeam, I had to remove the rivets that were introduced by Winnebago in one of their early Revel recalls.


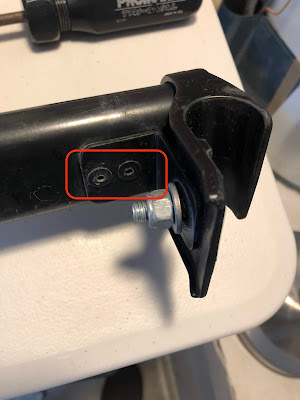
After removing the rivets and freeing the L-brace, I was able to invert the bar. However, to maintain the function of the L-brace, I had to drill a larger hole to replace the rivets with a 5/16" carriage bolt. I chose a 3/8" bit, matching the other 3/8" inch hole on the L-brace.


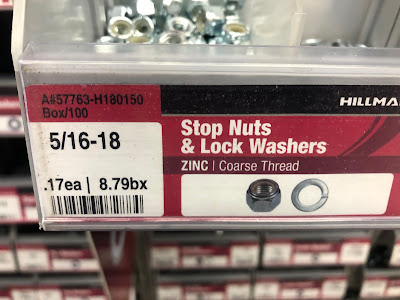
When this was complete, I was able to reassemble the crossbar fitting with carriage bolts and stop nuts (should have used stainless, but couldn't find it).


When the cross bar is back on the van with the lowered solar panel, it's much more streamlined than before.


Replacing Noisy Heater Fans

Early Revels (2018 and 2019) had noisy heater fans, very whiny and piercing, waking you up at night and making it sound like you're in a machine room. After reading in the Facebook group that Ralph Hill had replaced his fans with some higher quality & inexpensive aftermarket fans, I bought a box of the fans for about $18. They do not move quite as much air as the originals (about 15% less, I think), but they are nearly silent, and still push plenty of air.

At the recent California Revel Rally, Ralph Hill generously offered to replace the fans while Jim Lincoln and I watched & learned. These photos are incomplete and omit a few things, but they illustrate the major steps involved. Note: this is a kneepad job, so wear some!


Part 1: Dinette Fans


With the dinette seat and cover removed, you see the items in the following picture. You'll need to remove the 4 items shown with red X, including the central wooden brace that adds rigidity to the box.


The most dangerous part of the job is removing the orange power cable from the back of the inverter. It's got a lot of current going through it, so take care not to have any metal around, and insulate it with tape as soon as it's disconnected.


Remove the wooden brace to access the black box below it.


Opening the black box is a little tricky. First, remove the grills over the fan intake. The grills are held in place with plastic 'screws', and you pull them out using a prybar, like the teflon tools from a car trim removal kit. You can replace them with the metal screws that accompany the new fans, or you can re-insert the plastic screws that you removed.

The black box is a clamshell with a top and bottom half. To open it, you should use a flathead screwdriver to push in plastic tabs on the ends. When the tabs are pressed in, they release the top half of the plastic clamshell.


With the clamshell now opened, you can slide out the old fans and replace them with the new ones. Be sure to find the arrows on the fan showing airflow direction, and insert them with the correct orientation. Then you need to rewire the fans so that they have power going to them (sorry, no photos for this). 


Finally, you need to reverse your steps and put everything back together. Be sure to test your system before you reassemble, though!


Part 2: Garage Fans

The rear garage fans are easier to replace. To do this, you need to pull out the refrigerator by taking off its door, then removing 4 screws around the edge of the refrigerator, shown below with red circles. Slide the refrigerator to the Revel's garage and out of your way for a few minutes. 


This will expose an identical black box 'clamshell' that we saw under the dinette seat. Once again, remove the fan grills, press the tabs on the box to open it, and replace & rewire the fans as before.  Test it before you declare victory, then reverse your steps and reassemble the pieces.


Enjoy your new, quiet fans - - so much better than before, well worth $18! 

Many thanks to Ralph Hill and Jim Lincoln for sharing their time and expertise.


Shower Curtain Extension

Our shower curtain was about 1.5 inches too short, letting water splash out on the floor, etc. So I was happy to find 'snap extenders' for solving the problem.