Showing posts with label headliner. Show all posts

Removing the Ceiling Headliner

I've been chasing a roof leak, and needed to pull the ceiling headliner down in the front of the van. Here's how I did it.

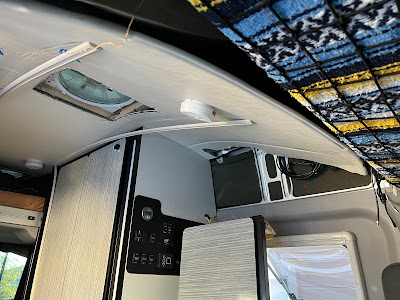
There are essentially 3 pieces keeping the headliner up in the front of the van, as shown below - - the dinette cabinet, a 'pinch' retainer bracket, and some trim over the sliding door. For the first item, see my blog post about how to remove the dinette cabinet.


Removing the two trim pieces over the sliding door is very easy, just a few self-drilling screws to remove.


The pinch bracket holds up the entire front of the headliner, and it vexed me. Based on the way it is built, it seems that Winnebago installs this bracket first, then slides the entire headliner forward into this pinch point when the van is empty. I couldn't remove everything in the van, so I resorted to brute force. 

There are three pieces to mess with. The arch trim is attached to a long piece of wood with two wood screws, and the wood is attached to the pinch bracket via an unknown method (glue?). I used a large screwdriver to pry the arch trim from the wooden piece just a little bit so that it introduced some play ('wriggle room') into the assembly. This wriggle room was enough to pull the headliner out of the pinch bracket, thus dropping the entire headliner in the front of the van. Note that the headliner is not glued or in any way attached to the pinch bracket, it just sits in the pinch slot, and the bracket keeps it from flopping down.


After removing some screws in the headliner's track lighting, the entire headliner bends down and you can access the roof. In my case, I did this so that I could find the source of a roof leak on the front passenger side.


After pulling down the copious foam insulation that's attached to the roof, the bare metal is exposed, and you can see what you're dealing with. For me, it was useful to examine the roof rail screws and the rivnuts that Winnebago installed for mounting the awning in its factory location. (My awning has been moved from the factory location and I needed to make sure that these points weren't leaking).


To put it back together, I just did everything in reverse order, although I found that it took two people to get the headliner seated properly in the pinch bracket. No visual damage was done, it all looks original and untouched.


20-December-2021

Removing the Dinette Cabinet

I needed to remove the dinette cabinet so that I could get behind the ceiling headliner. I found that it's easy to remove it, but harder to put it back up. Here's how to do it on a 2018 Revel.

After removing the inside of the cabinet ('floor' of the cabinet is a separate piece, and the back & 'ceiling' of the cabinet are a single folded piece) with regular screws, you're faced with 8 screw locations that are holding the cabinet to the ceiling and wall.  An overview photo is the following:


The 2 screws that attach to the shower wall are here.


The three screws that attach to a metal bracket above the headliner ceiling are here.


Three screws attach to the driver's side wall here.


Here's where the wall screws attach through the cabinet (one of three screws shown).


Reattaching the cabinet is a good job for two people - - it's a bit tricky to lift the cabinet, get the holes lined up, and tighten it all by yourself. Make sure that you're on good terms with your helper, because you'll be swearing a fair bit. 


20-December-2021

Headliner Net

As mentioned in other posts, we added a colorful Mexican Falsa blanket to our headliner shelf to help with road noise and to add a little flair to the cockpit. In order to provide some extra storage, I decided to add a cargo net to the underside of the shelf, as shown below.

I bought some S-hooks and bent them with pliers to create anchors, and then attached these anchors to the bolts at the edges of the shelf.


Then I poked the anchors through the blanket and attached the net at 8 different points (3 on the left and right, 1 in the back and front).


This provides some overhead storage for maps, hats, etc.


Outerwear

We use our headliner shelf for storing all of our outerwear. However, hats and gloves get lost up there, so we're using packing cubes for storing them. Color-coded cubes might be handier for identification at a glance.


Headliner Shelf

I installed RB Components' "Sprinter Headliner Shelf" in our Revel, and have attached some annotated pictures of before & after. It's available on Amazon as a prime item (free shipping!), and arrived in good shape. However, one bolt was missing (possibly due to shipping), and the instructions are very poor (almost non-existent, didn't like that at all). It took me about two hours to install, is technically very easy (two torx screwdrivers and a ratchet set), but is awkward to lift and tighten into place without a 2nd person at a few key moments. 


It offers a crazy amount of additional storage space - - it stores all of our privacy screens, sleeping bags, coats, blankets, owner's manuals, etc. Note that it requires the removal/loss of the little plastic shelves that Mercedes installed in the vehicle - - if you want to keep those, then RB Components makes a "Raised Headliner Shelf" that preserves those shelves, but cuts the storage in half (approx). Since compartments and cabinets in the Revel are in short supply, we opted to maximize the storage and chose the larger shelf.


Lots of wasted space, IMHO. However, it does allow you to stand upright when exiting the front seats.
Amazon Prime saved about $150 in shipping.


I was bummed that I scratched the headliner getting it into place. It's awkward and heavy, get a buddy for a few key moments.

Won't be needing these anymore, but hated to give them up. If you want to keep these, then get the 'Raised Headliner Shelf', but you'll have about half of the storage.

You don't notice the difference in headroom as a driver or passenger, and the audio system sounds better. 

There is a risk of cracking your forehead, though, so I looked at a million different products, including swimming pool noodles and pipe insulation, and came up with this. It fits well, provides great padding, and easily fastens to the edge of the shelf with double-sided tape.

I think that road noise has increased a bit, though, so during a trip, we grabbed an old Indian blanket that we had sitting around and wrapped it around the shelf on a whim. It helps with high frequency noise.

Turns out that it grew on us, though, so now it seems to be a semi-permanent part of the van.