Heating System Improvements

After using the heating system in our 2018 Revel for 2.5 years, there were a few improvements that we wanted to make. Since the system was designed by Rixen's Enterprises in Sandy, Oregon, we decided to have them do the work, and we drove the van to Rixen's in July, 2020. 

Our goals were the following:

  1. Replace the stock Winnebago thermostat with a modern, more accurate version;
  2. Relocate the Espar heater to the back of the battery box on the driver's side;
  3. Service the Espar heater;
  4. Replace the somewhat noisy glycol pump with a newer, quieter version;
  5. Add an engine heat exchanger so that we could drive through sub-freezing temperatures without having to use the Espar heater to keep the tanks warm.
All of this was accomplished in about 4 hours, and cost about $950.

A diagram of the heating system, compliments of Bob Fulton from the Revel group on Facebook, shows all the major components, along with the changes that we made on this trip.


The original thermostat was cheap, simple, and highly inaccurate. Rixen's have made a newer version for their system, and while it's a bit more finicky, it's also more accurate, with a 'swing' (hysteresis?) of about +/- 2 degrees.  We're generally happy with it, though it takes some light touches with its touch-sensitive interface. Also, since it's more sensitive, it cycles the furnace much more often than the old thermostat.


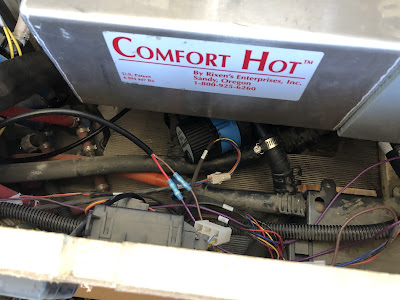
It was necessary to relocate the Espar furnace because Winnebago installed them high on the frame during 2018-2019, in an extremely inaccessible location. Thus, if the Espar needed maintenance or troubleshooting, it was very difficult to access. The standard location in newer Revels is to mount it on the back of the driver's side front battery cage, which is what Rixen's did for us, shown here. They also serviced the Espar, replacing the used atomizer screen for the igniter, flushed and replaced the glycol, and found that our altimeter had never been properly wired by Winnebago back in October 2017, when our van was built. We also picked up spare gaskets and atomizer screens in case we need to service the unit in the future. Here is a photo of the Espar in its new location.


Due to its new location, we rerouted the exhaust line, bringing it up higher, and putting it behind the galley window.


The original glycol pump was somewhat whiny, and I want the quietest van I can get. Rixen's newer pump is almost dead silent, and apparently has 2x the power of the previous version, so we had Rixen's install it. In the following photo, it is the blue appliance under the glycol tank. 


Finally, we added a heat exchanger from the engine to the heating system so that we can use the engine's heat instead of running the Espar. This is advantageous when driving through sub-freezing temperatures because it will keep the van's tanks from freezing WITHOUT having to run the Espar furnace. A heat exchanger is installed under the van, just below the glycol tank, and two lines (in & out) are run from the engine's coolant system back to the new exchanger. 

A view of the heat exchanger, with brass fittings, mounted up high along the frame with two lines of coolant running to it from the engine.


Here are a few photos showing the changes that are made to the cooling system under the hood.


The trick for keeping the tanks warm while driving is that the circulation pump must be running, so that is accomplished by turning on the system, setting the thermostat to some high temperature, and turning the fans off. The fans are turned off with the center setting of the fan speed switch. (Note: Bob Fulton improved this kludgey configuration by installing a proper switch - - see the Facebook group for details.)

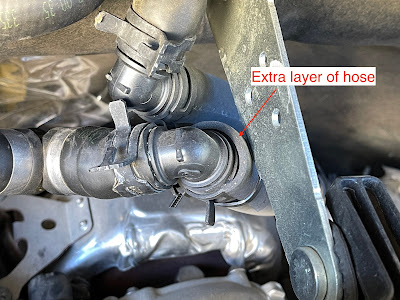
One point of failure for the heat exchanger is a rupture in the coolant lines that run back to the exchanger, specifically where they are mounted near the engine, where they are susceptible to abrasion. One Revel owner has already found a leak from this, so care must be given to how the lines are mounted. Here is how mine were originally installed - - note the potential for abrasion from the engine lift hook.


I wrapped my lines in an extra layer of hose, and ziptied them to the engine lift hook, shown below. In this way, the extra layer absorbs the abrasion, but this remains a contact point that has to be monitored.


A better way of doing this is Bob Fulton's approach, in which he manufactured an arm to hold the lines free of the vibration. Bob says that to manufacture this arm, "It was an 1" over (part with hole drilled), then 2" up, then 4" over again."


Bob Fulton also made an excellent diagram of the heating system, along with a cheat sheet on how to use it.


Finally, meet Jim Rixen.


14-July-2020

Upgrading the Suspension

After driving the van for 2.5 years, I was very familiar with the top-heavy wobbling of the van on curves, washboards, and other bumpy terrain. I read many recommendations to upgrade the suspension to improve handling, and after conferring my with trusted advisors at San Carlos German Auto Works, I opted for the Van Compass suspension upgrade.  They have recently changed their naming conventions, so I'll avoid calling it a 'Stage X', and just say that we installed the Fox shocks on the front and back, along with a Sumo spring in the front, costing about $2000. After doing this, I can see that the van's rear is about 1.5" lower in the back than in the front, so it may be useful to install the VC mini leaf spring in the rear as well.

The result is a van with better handling. Rather than wobbling through curves, it now seems to hug the road, carving through curves. The wobbles are greatly dampened, and the experience of riding in the van is more pleasant. 

In the front, the original shocks are left in place, and one more is added to each side, Here is a photo of the front driver's side, showing the new VC shock and its special mounting bracket, with the original shock shown at the right.


You can see the top of the additional shock mounting point from inside the engine compartment.


The rear shocks were simply replaced with the new VC shocks.


UPDATE July 2021

We finally got around to adding the rear mini-leaf spring to address the 1-2" sag that we were seeing in the rear. This cost approximately $800 with labor in California.

In this photo, the new leaf spring is the glossy black item beneath the older springs.


It seems that we gained about 2 inches of height in the rear, giving it the appearance of being slightly raked forward.


So, in summary, we installed 2 additional shocks in the front, 2 in the rear, a Sumo spring in the front, and the mini-leaf springs in the rear. Love the ride and the handling.

21-Sept-2020

Fire Extinguisher Upgrade

We replaced the stock fire extinguisher with an Element extinguisher, thus freeing up the space on the passenger seat base. We mounted the Element on the back of the bench seat, and mounted a storage cubby in its old location.


17-Oct-2020

Storage Pocket

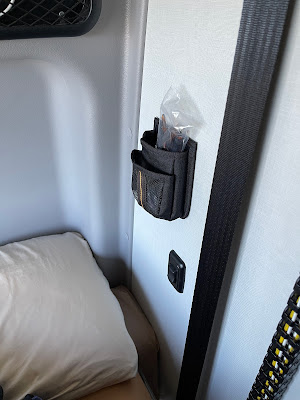
We needed another small storage pocket in the bedroom for storing glasses, chapstick, etc, and were happy to find this this handy unit from Amazon. It clears the bed when it raises & lowers. I just used some double-sided VHB tape, and it holds perfectly.


13-Oct-2020

Replacing the Macerator Impeller

After about 2.5 years, the sink macerator in our 2018 Revel stopped functioning effectively, resulting in a slow drain that sometimes required us to use the palms of our hands as a plunger. After seeing Guido Lyons' post in the Facebook group about replacing the impeller, I finally ordered the parts and did the job. I have to say that this is one of my least favorite maintenance items in the Revel, and needs to be made simpler. I took the lazy way out and didn't disconnect the pump at all, I just repaired the impeller with the pump left in place.

Here are the illustrated steps.

You need to pull the refrigerator by removing the four screws around the front bezel, and set it aside. 


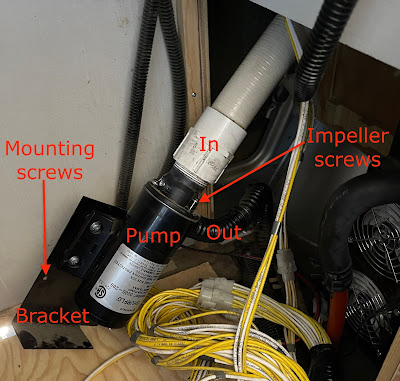
In the right rear, you see the macerator pump mounted to the van's frame with a bracket and four screws.


The pump is held in place with a bracket and 4 screws in the van's frame. This photo, with the pump removed, shows the locations of the bracket's screw holes.


In order to completely extract the pump from the van, you have to remove the four bracket screws, disconnect the INFLOW connection, disconnect the OUTFLOW connection, and cut the power leads. As shown in this photo, I took the easy way out and simply removed the four bracket mounting screws and loosened the pipe connection at the sink drain so that I could replace the impeller without having to disconnect anything else. In particular, the IN connection was affixed with some sort of cement that was too difficult to remove. 


Removing the three 'impeller access screws' at the top of the pump reveals blades that must be removed with a 7/16" socket. With the nut and blades removed, the silver disc below can be lifted up.


Under the silver disc you find the impeller itself. Surrounding the edge of the pump at this seam is a soft gasket that must be replaced, along with the impeller. I used silicone grease on the gaskets.


There is also a gasket in the upper section ('lid') of the pump that must be replaced.


The impeller just pulls out of its chamber with a pair of pliers, sliding easily on the motor's spindle.


The replacement parts were approximately $35, and the part number is shown in the photo below.

The cause of the macerator failure seems to be that the rubber impeller arms become fatigued, and they stop making a tight fit in the pump chamber. This picture shows 3 years of wear on the old, fatigued impeller. Note the bent impeller arms, in contrast with the new unit on the right.


If you decide to extract the pump from the van, you'll need to cut the pump's power wires. Since this is a maintenance item that must be performed every few years, it may make sense to install easy connections, like bullet connectors, for the next time.  Ralph Hill informs me that the pump's wires are 14 gauge, and the WGO wires are 10 gauge.


Jan-15-2021