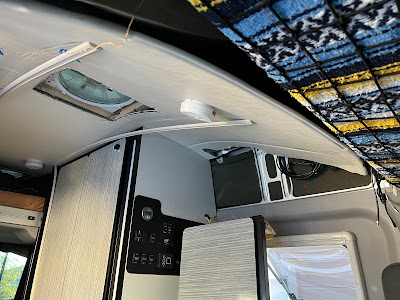
I've been chasing a roof leak, and needed to pull the ceiling headliner down in the front of the van. Here's how I did it.
There are essentially 3 pieces keeping the headliner up in the front of the van, as shown below - - the dinette cabinet, a 'pinch' retainer bracket, and some trim over the sliding door. For the first item, see my blog post about how to remove the dinette cabinet.
Removing the two trim pieces over the sliding door is very easy, just a few self-drilling screws to remove.
The pinch bracket holds up the entire front of the headliner, and it vexed me. Based on the way it is built, it seems that Winnebago installs this bracket first, then slides the entire headliner forward into this pinch point when the van is empty. I couldn't remove everything in the van, so I resorted to brute force.
There are three pieces to mess with. The arch trim is attached to a long piece of wood with two wood screws, and the wood is attached to the pinch bracket via an unknown method (glue?). I used a large screwdriver to pry the arch trim from the wooden piece just a little bit so that it introduced some play ('wriggle room') into the assembly. This wriggle room was enough to pull the headliner out of the pinch bracket, thus dropping the entire headliner in the front of the van. Note that the headliner is not glued or in any way attached to the pinch bracket, it just sits in the pinch slot, and the bracket keeps it from flopping down.
After removing some screws in the headliner's track lighting, the entire headliner bends down and you can access the roof. In my case, I did this so that I could find the source of a roof leak on the front passenger side.
After pulling down the copious foam insulation that's attached to the roof, the bare metal is exposed, and you can see what you're dealing with. For me, it was useful to examine the roof rail screws and the rivnuts that Winnebago installed for mounting the awning in its factory location. (My awning has been moved from the factory location and I needed to make sure that these points weren't leaking).
To put it back together, I just did everything in reverse order, although I found that it took two people to get the headliner seated properly in the pinch bracket. No visual damage was done, it all looks original and untouched.
20-December-2021


