Showing posts with label screens. Show all posts

Cabin Vents for Front Windows

The cabin can get extremely hot and airless, so I've looked for a few ways to securely vent that area. I've recently gotten some Overland Screens for the van, and they seem to work well, so far.


NoteI previously tried these and decided to not continue using them - - too much hassle to install and remove.


17-May-2021

Rolef Screen Cleaner

Rolef recommends using this stuff for cleaning their screens, and I can confirm that it does an excellent job at restoring them to like-new condition.


08-May-2021

Rolef Screens

Our 2018 Revel came equipped with the Winnebago screens that didn't function well. We finally bit the bullet and bought a set of Rolef screens for $1600, and installed them ourselves.  The installation was not particularly difficult, but it requires patience, accuracy, and watching the Rolef videos on YouTube over & over (no instructions come with the screens).

Here's a picture of one of the original screens.


And here are the new ones. Very flexible and functional, well worth the time & money.


October 2019

Daytripping vs. Roadtripping

The Covid pandemic has us using our van a bit differently for the past four months, and it's caused us to make some changes to how we organize our van. Rather than taking long road trips, overnighting with a lot of gear, we're mostly doing day trips, not taking much gear at all, and using the garage differently.

This is our normal roadtripping mode, with all the gear that we need for weeks at a time, organized and labeled in totes.

We don't need most of that gear (water replenishment, tools, many changes of footwear, campfire materials) when we're on a day trip to the beach or mountains, so I pulled almost all of that gear out of the van. Taking a cue from the fabulous Canyon Adventure Vans' GLSS, I replaced it with a couple of comfortable folding chairs and a camping table, giving us the daytripping configuration shown below. This gives us another 'room' to dine in, watch the whales out the back, whatever. 

However, if you're in a place where you need to use the insect screens, and you have the excellent Rolef screens on your van, then your view is blocked because the lower panel of the screen is opaque. Bummer, dude.

So I used one of the old-school Revel screens from model years 2018-19 to give us floor-to-ceiling views. This works great, and we love the screened-in porch vibe.

It was a little tricky to attach the Winnebago screen to the Rolef screen, and I had to make some stuff. Here's what I did...

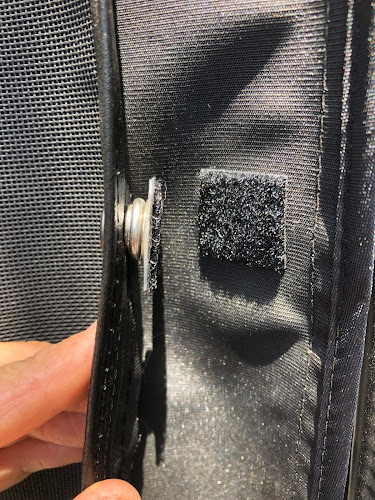
I wasn't going to uninstall the Rolef screen just for day trips, so I needed a way to attach the Winnebago screen to it. Since the Winnebago screen only offered snaps for attachment, I made 'velcro snaps' to solve the problem.  I cut 1" x 1" squares of plastic by cannibalizing a Flexible Cutting Mat, then attached snaps to them. Then I attached some self-adhesive velcro squares, yielding what you see below.


Then I attached velcro squares to the Rolef screen, shown below. Works great, no bugs, floor-to-ceiling screened-in porch for the pandemic.


May-2020

Bug Screens for the Cab Windows

Sometimes it gets too hot in the front seats when we're parked at camp, so I wanted to find a way to get some ventilation through the cab without letting bugs in.  The horribly named Skreenz offers a 'screened pouch' that you can drop over your door, allowing you to open the front windows without bugs entering.  They also have a velcro drawstring to tighten the screens around the mirrors, along with magnets to keep the screens from moving around. I haven't found either of them to be necessary, so far.

They're a somewhat expensive addition to the van, and I don't use them all the time, but on a hot day in the front seats at camp, they can be pretty handy.


NOTE: I discontinued using these screens in lieu of a simpler vent found here.


May-17-2020

Screen Compartment

I didn't like the fact that our screens and tarps didn't have a safe, flat place to reside without getting smashed or bent. 


I noticed that there about 3 inches of vertical space in the rear of the bed, so I decided to make a compartment for the screens and tarps there. However, the belts that raise the bed also travel through this space, so I needed a way to shield the screens and ensure that they didn't slide into the belts and get chewed up.

I wandered the aisles of my hardware store to find something that was L-shaped, lightweight, several inches high, and could be installed into the Revel non-destructively. I came up with this thing, which has a plastic L shape and which I could easily cut into two pieces with a hacksaw.

I fastened the two pieces to the inside of the bed with double-sided tape. In the above picture, you can see one of the pieces forming the left side of the new screen compartment. 


This is an overview of the new 22x29x4" compartment with the screens inside. The left and right sides are formed with these L-shapes, the top is formed by the center brace that Winnebago installed in the bed, and the bottom side is formed by the side of the bed itself. This works very well - - they don't move around, they don't get beat up & smashed/bent, and they are easy to access by just lifting the mattress and reaching in.