Showing posts with label lighting. Show all posts

Bed Motor Cover

I finally removed the cover from beneath the bed in order to free up more space. 


I used a piece of the bed cover to shield the motor.


I also added some hardwired LED strips to the underside of the bed for proper lighting, since the 2018 Revel didn't have any.


I also added the Bed Head Bumper from CAVans to soften the blow.


2023 July

Offroad Lighting

In the past 4 years of owning our Revel, we've had many night drives on lonely country roads with deer, elk, bison, and other hazards in our way. For those times, we've often envied the folks with serious offroad lighting, like lightbars and flood lights, and finally decided to do something about it.

Our friend Carol has some very nice Baja Designs Squadron Pro lights that she purchased from Agile Offroad, but unfortunately they no longer make this for our 2017 Revel (NCV3). However, with the help of our friends Tony & Wanda Loeza at San Carlos German Motor Works, we were able to reproduce the system from various places. 

We've now used them a few times and they are seriously BRIGHT. You can't use these lights in traffic, and if you want to do that, you should get the SAE version.


The light scuffing in the rubber pad in front of the bracket is due to the slight modifications that we needed to make for the NCV3 Sprinter


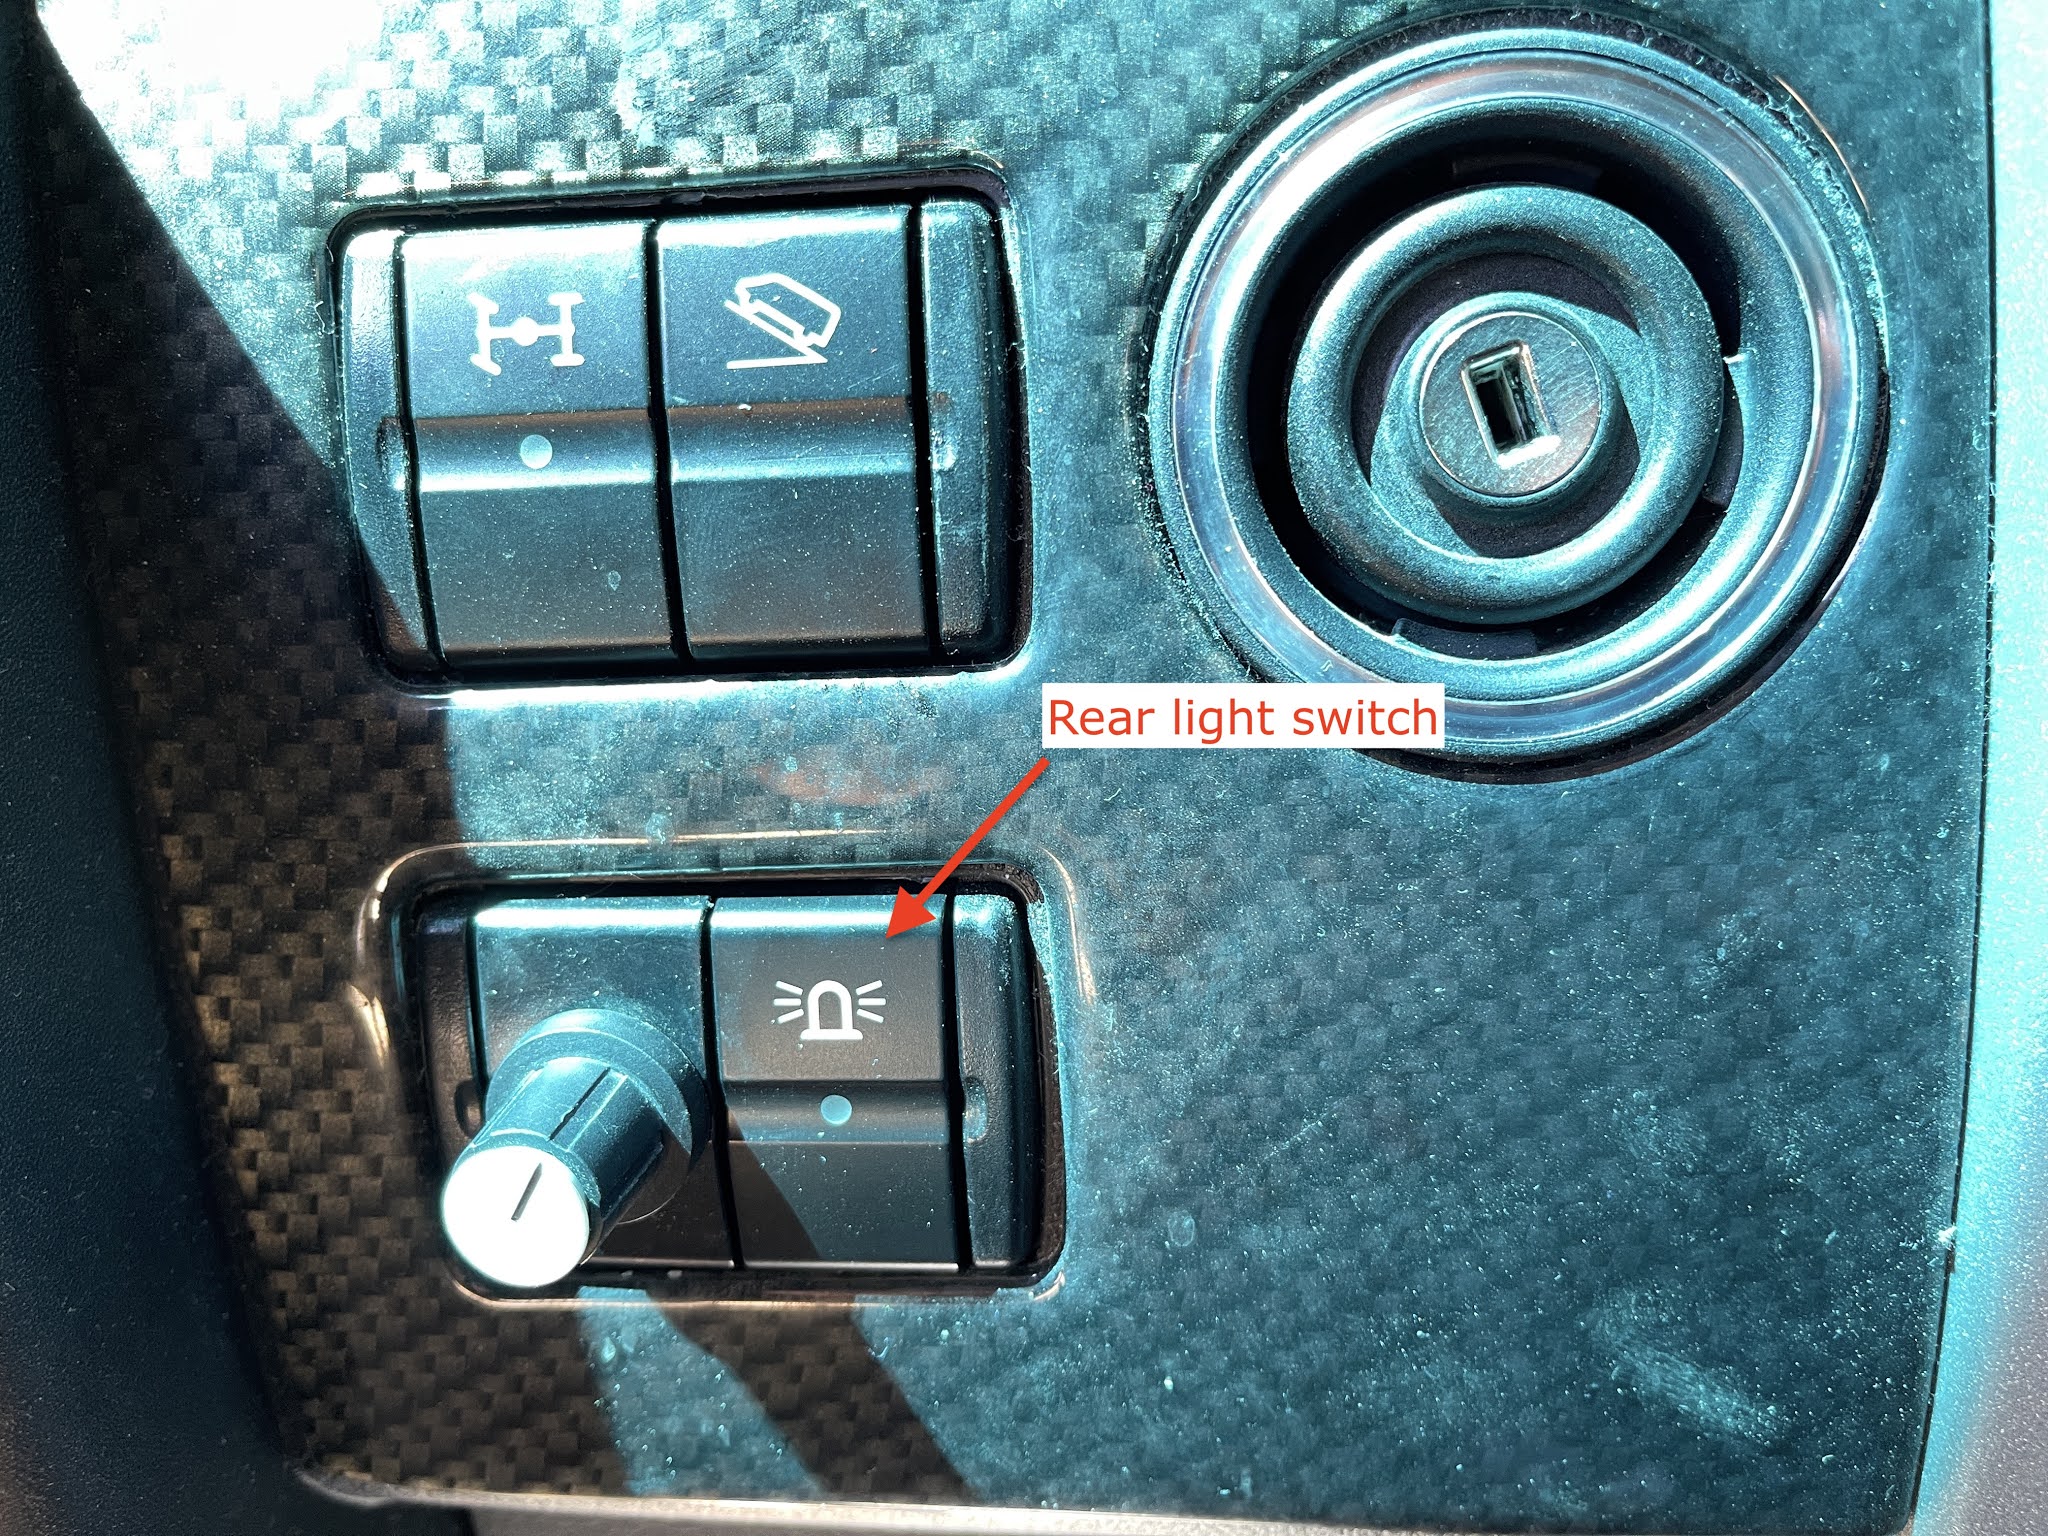
We love the professional, factory-style buttons that come with the wiring harness. The left button controls the white lights, and the right button controls the amber lights.


18-July-2021

Rear Lights

We've always found the back-up lights to be poor (nonexistent) on our 2017 Sprinter, so we were glad to see that the Baja Designs S1S lights work so well for lighting up the rear of the van.  Tony & Wanda Loeza at San Carlos German Motor Works professionally installed them for us, including front and rear switches (see below). 


New front lighted switch for the driver (subwoofer knob shown on the left).


New rear lighted switch if you need lights when standing at the back doors.


It's now very bright when backing up or needing to get something done back there.


18-July-2021

New Headlights & Foglights

Our 2017 Sprinter had the original old-school halogen headlights from Mercedes, and we found them to be dim, yellowish, and something of a safety hazard. After envying all the bright, modern LED headlights that we see on the road, we consulted with Tony & Wanda Loeza of San Carlos German Motor Works, and they recommended (and installed) the following:

  • LED Headlight Lowbeams: Lasfit Pro-G2
  • LED Headlight Highbeams: Lasfit Pro-MB1-N
  • LED Foglights: Morimoto LED 2Stroke 3.0
After using them for a month or so, we can see a very big difference and a much improved ability to see at night. Also, when replacing the halogen bulbs with LEDs, the Sprinter's electronic system will normally complain that a bulb is burnt out every time that you turn on the headlights. However, Tony & Wanda were able to purchase a software patch for our van that removes that warning - - contact them for more information.


18-July-2021

Porch Lights in Black

It was finally time to convert the chrome porch lights to black ones, as they should have been all along. Some people like to repaint their existing lights, but I bought new ones in black, and applied the new black bezels to the old lights. I also cleaned up the rust areas underneath, following these nice video instructions from Owl Vans.


14-May-2021

Light Replacement with USB Ports

We don't need both of the puck lights in the bed area (we rarely use them at all), but we do need to charge our devices there with USB ports. I decided to remove one of the puck lights and replace it with a dual USB port. It was a trivial replacement - - just snip two wires, attach two new female spade connectors, and it's done.


12-October-2020

Rocker Switches with Labels

I got tired of trying to remember what the blank switches were, so I 'designed' and ordered new ones from rockerswitchpros.com. They arrived in about 3 days, and they fit & function just fine. I highly recommend ordering the $4 removal tool from them, because it's very easy to break the switch when you remove the cover.  


15-Oct-2020

Mood Lighting for the Galley

We don't use our RAM mount under the galley cabinet, so I repurposed it for mood lighting. These inexpensive ($11) LED light strips fit perfectly into the slot in the RAM track. 


For power, I just tapped into the USB port a few inches away, and added a simple rocker switch for turning the light strip on/off. 


Oct-11-2020


Mood Lighting Switch

I've been looking for a cleaner way to organize the various strands of USB mood lights that I've mounted in the van, and was glad to find this $9 USB switch


I secured it with double-sided VHB tape to the panel directly behind the driver's headrest. 


This is a good location for managing and disguising the various cords that will be involved in this mod.


We don't use the RAM track above the galley, so I also installed this color-changing LED strip directly into the recessed groove, but left the color-changing controls easily accessible.


It's getting weird in here - - just the way we like it!

USB Upgrade & Nightlight

It's easy to upgrade Winnebago's factory-installed USB ports to provide faster charging (NB: for non-Apple devices!), and depending on which replacement model you select, you can get a nightlight with it, too.  I chose this model for about $16, and it took about 15 minutes to install. Here are the steps I took to replace the USB ports under the galley cabinet:


Remove the two screws in the USB port's faceplate.

Remove 4 screws inside the bottom of the dinette cabinet, along the front edge.

Use a flathead screwdriver to gently pry the bottom of the cabinet up. Notice that there are staples in certain areas, so you need to gently work them out as you lift the cabinet bottom 3 inches or so.

Pull the USB port down (gently), and notice that WHITE is NEGATIVE polarity in Winnebago's wiring here. Disconnect the wiring simply by pulling.

Put the new USB port in the original faceplate, attach the new USB port to the existing wiring (Yellow is +, White is -), and put the port back in the hole in the bottom of the cabinet.  Use the new USB port's lock ring (red arrow in the above picture) to tighten it against the cabinet.

You now have new, higher powered USB ports that indicate current voltage, and the LED provides a small night light. If you don't want the night light, then you can cover it with a small amount of nail polish. Thanks to Jim Lincoln in the Revel Facebook group for the part number and inspiration!


Mood Lighting

This is how we roll - - we like to hang out inside during a cold winter night in the desert, and we LOVE mood lighting. Off the grid - - warmth, music, low lights, good vibes! 

We bought these USB LEDs from Amazon, and really like them -- they're cheap, small, and put out a lot of color. These particular ones have a color selection switch on the side to match your mood, or they cycle through all the colors, reminding you of your last bender. We put them at all the USB ports in the van.


A moment of red in the front, blue in the back, apparently. (We also like the gold accent colors provided by LED candles, shown here.)


We find that the van is very dark at night, so we needed a night light. We bought another USB LED stick that is dimmable and puts out white light. (There is a surprising lack of USB-powered nightlights, by the way.) We use this one over the cooktop on its lowest setting, and it's just right. Sips power all night, provides lighting for the bathroom in the middle of the night, and remains cool to the touch in the morning.


One principle of usability is software is that you won't use a feature if it's not convenient, and the same is true with these lights. If we're always storing them in a packet in a drawer or cabinet, then it becomes an impediment to using them. I set out to solve that.


I gathered these materials...


And did this with the strip of elastic. I hated to put holes in the van, but they're very hard to see, and can easily be refilled with spackle at some later date. 


Problem solved - - they're always exactly where you need them, easily accessible for plugging and unplugging, and totally safe from being harmed. (This is the USB port over the cooktop, where we use both the color stick and the nightlight, so they're both mounted here, depending on the application.)