Showing posts with label storage. Show all posts

Organizational System for Our Gear

The Revel doesn't have much built-in storage, and we like to stay very organized in a small van, or things get chaotic and unworkable very quickly. In other words, we're 'everything must have its place' people. Here is what we've done to keep ourselves organized -- this is basically how we roll after fine-tuning it for a few months.

We are not adventure sports people (although we admire them!), so we don't have climbing gear, kayaks, etc. Instead, we do 'backroad/offroad touring', usually with our bikes on a rack behind us, and our gear reflects that. This is basically how we make camp every night (scene from breakfast at Joshua Tree in January): zero-gravity chairs for campfires and star-gazing, and a folding table for meals and miscellanea.


We keep the bedding on the bed, and just raise the bed everyday so that we have access to the garage, and the bedding stays clean and tidy. 


All of our gear is organized into tubs. From left to right: 

  • Lower left grey tub is for the water resupply, like water hose and filter, gravity pour spout, funnel, water bandit, etc. 
  • Upper left grey tub is for pantry and household sundry overflow, like garbage bags, extra paper towels, ziplocs, laundry soap, extra boxed/bagged food.
  • Lower blue tub in the middle is power cord, large toolset, jumper cables, emergency equipment, extension cords; 
  • Upper blue tub in the middle is footwear: boots, shoes, flip flops; 
  • Black tub is firewood, firestarter, kindling, hatchet, gloves, marshmallow forks for smores, and other campfire stuff;
  • Lynx Levelers and Dustbuster (it has found a home since this picture was taken);
  • Outdoor zero-gravity chairs and outdoor folding table. 
I have not used a single bungee cord — the carpet in the back keeps everything from slipping. And there are labels on everything, which gives us inner peace, dammit.


Looking at the back row of garage:

  • On the right we have two grey tubs that serve as our 'clothes closets'; these are his & hers tubs, and they hold about 10 days worth of clothes in an organized fashion.
  • Just above them is a tub full of full water jugs for drinking; until we’ve had a chance to sanitize and install a water filter on the line, we are carrying drinking water. This is not sustainable, and we will not keep buying/hauling jugs of water in the near future.
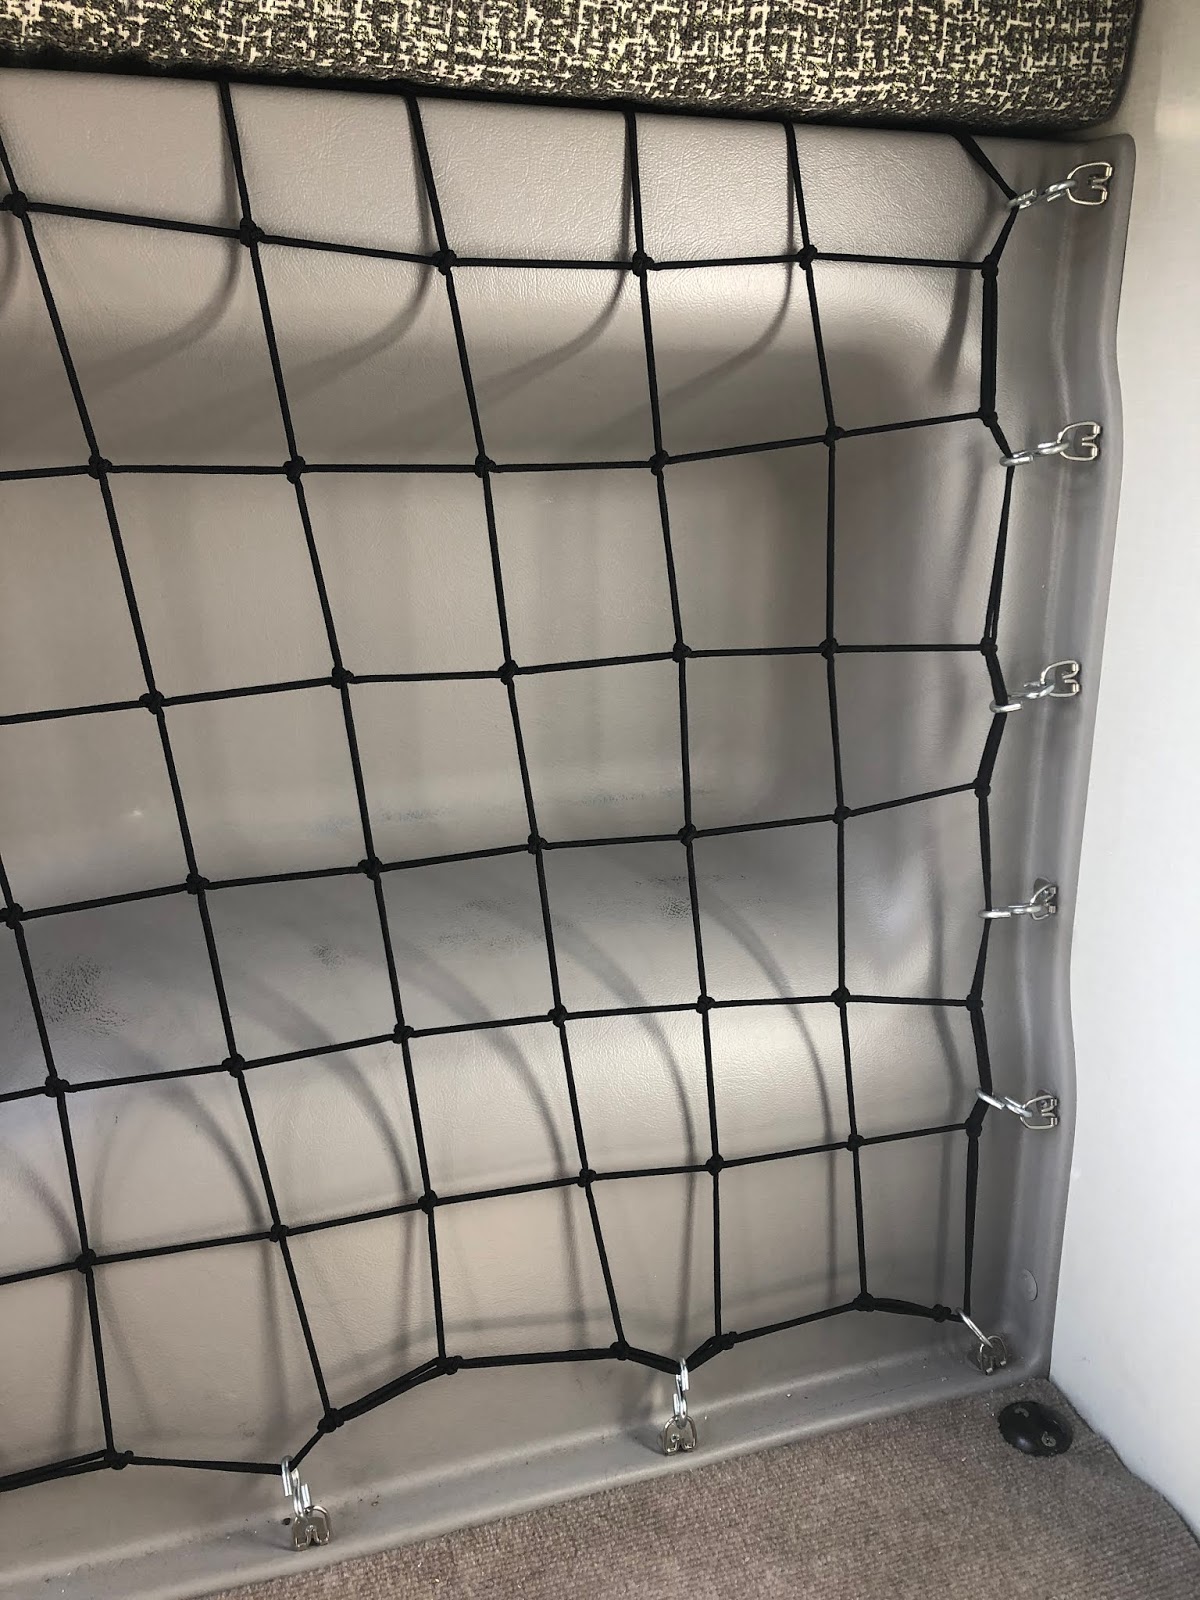
  • On the left is the cargo net, which holds all of our exercise equipment for daily exercise: yoga mat, weights, resistance bands, tarp for outside exercise, and small ball.


Nightstand Pockets

We've really missed having some sort of 'nightstand' on either side of the bed for all the normal stuff: kindles, chapstick, kleenex, etc. 

We decided to install some sort of cargo pockets on the wall above the bed, and decided that it should have a rigid frame, no adhesive, and accommodate enough stuff without ripping out of the wall. I found these things on Amazon, and they came to us from Germany (took a couple of weeks to receive them).


I was extremely concerned about putting holes in the wall near the flares, because the flares are made of fiberglass. Also, it was unclear to me if the plastic 'shell' that surround the whole garage would be strong enough to hold screws & weight.  After taking some measurements of the plastic and the fiberglass, I settled on these screws, and they worked perfectly, staying away from the fiberglass. If you do this, I highly recommend these screws (7x1/2" flathead), but don't over-tighten them, or you'll lose your grip in the plastic!


The pockets work very well, and are rock-solid, no danger of them falling off the wall at all.


2020 Update


This system continues to work well, but we added yet more storage with this pocket, ideal for holding iPads and similar. Once again, I used simple screws in the plastic walls, and there have been no problems at all with it.


Console Storage

Since we removed the Mercedes shelves near the visors in lieu of our headliner shelf, we are short on cockpit storage. I moved the old console organizer from our Eurovan Camper into the Revel, and it works pretty well. 

It also comes in black, and can be found at Pep Boys and Amazon.


Outerwear

We use our headliner shelf for storing all of our outerwear. However, hats and gloves get lost up there, so we're using packing cubes for storing them. Color-coded cubes might be handier for identification at a glance.


Mood Lighting

This is how we roll - - we like to hang out inside during a cold winter night in the desert, and we LOVE mood lighting. Off the grid - - warmth, music, low lights, good vibes! 

We bought these USB LEDs from Amazon, and really like them -- they're cheap, small, and put out a lot of color. These particular ones have a color selection switch on the side to match your mood, or they cycle through all the colors, reminding you of your last bender. We put them at all the USB ports in the van.


A moment of red in the front, blue in the back, apparently. (We also like the gold accent colors provided by LED candles, shown here.)


We find that the van is very dark at night, so we needed a night light. We bought another USB LED stick that is dimmable and puts out white light. (There is a surprising lack of USB-powered nightlights, by the way.) We use this one over the cooktop on its lowest setting, and it's just right. Sips power all night, provides lighting for the bathroom in the middle of the night, and remains cool to the touch in the morning.


One principle of usability is software is that you won't use a feature if it's not convenient, and the same is true with these lights. If we're always storing them in a packet in a drawer or cabinet, then it becomes an impediment to using them. I set out to solve that.


I gathered these materials...


And did this with the strip of elastic. I hated to put holes in the van, but they're very hard to see, and can easily be refilled with spackle at some later date. 


Problem solved - - they're always exactly where you need them, easily accessible for plugging and unplugging, and totally safe from being harmed. (This is the USB port over the cooktop, where we use both the color stick and the nightlight, so they're both mounted here, depending on the application.)

Drawers

This is our early attempt at using the galley drawers in the Revel. As the months have progressed, we have made some refinements, but it's basically what you see here.


This smallest, lower drawer is holding atmospherics, like candles, LEDs, Xmas lights, etc.

Galley Cabinet and Dishes

This is our solution for storing cookware in the cabinet over the stove. Nested cooking pots on the left, plates and pans nested in a vertical holder, insulated coffee mugs on the right. Everything is wrapped with foamy cloth stuff (cabinet shelf liner?) to keep items from rattling. We hate rattles!

Cargo Net in the Garage

My wife and I feel that ‘everything has to have its place’ in a small van, and can’t stand disorganized, jumbled crap rolling around & getting under foot. Since we travel with oddly-shaped exercise equipment (like the yoga mat, below), we needed a simple solution for it. 


As a first approximation, I threw this cargo net solution together very quickly. It was wider than we needed, so it’s doubled over on the right side, but could stretch to the back corner of the van, if needed. 


I wanted any/all mods to be non-destructive, so I used existing screws for the tie-down points for the cargo net. In this case, I bought some ‘1 Hole Strap’ fittings that are used for tying down electrical conduit, and bent them to make them a bit smaller & tighter. 

Just to be clear, I did NOT drill new holes here, I just used existing wood screws that fastened to the cabinetry through the plastic housing. 

This is ugly, but it was the fast, $2 solution that my hardware store had. I’m just CERTAIN that there is a little device that slips over a screw head in order to provide a ring or hook point, but I’ll be damned if I could find anything in my local store. 

Edit: This would be an improvement: https://fasteners.fasnap.com/viewitems/metal-d-rings-hardware/screw-mounted-d-rings


WGO ships the Revel with three screws in the top of the bolster (under the bolster pillow) that are driven into the steel frame. I used these as the anchor points, then attached two chain links and an S-hook. Again, this was the fast, $3 solution to the problem that I found in my limited hardware store. 


Here’s the cargo net that I bought off Amazon for a few dollars. 


Update 2020

I finally followed my own advice and used D-rings throughout the project. I'm not sure if I'll continue to use the black plastic hooks that accompanied the cargo net, or if I'll maybe bend some S-hooks.


Screen Compartment

I didn't like the fact that our screens and tarps didn't have a safe, flat place to reside without getting smashed or bent. 


I noticed that there about 3 inches of vertical space in the rear of the bed, so I decided to make a compartment for the screens and tarps there. However, the belts that raise the bed also travel through this space, so I needed a way to shield the screens and ensure that they didn't slide into the belts and get chewed up.

I wandered the aisles of my hardware store to find something that was L-shaped, lightweight, several inches high, and could be installed into the Revel non-destructively. I came up with this thing, which has a plastic L shape and which I could easily cut into two pieces with a hacksaw.

I fastened the two pieces to the inside of the bed with double-sided tape. In the above picture, you can see one of the pieces forming the left side of the new screen compartment. 


This is an overview of the new 22x29x4" compartment with the screens inside. The left and right sides are formed with these L-shapes, the top is formed by the center brace that Winnebago installed in the bed, and the bottom side is formed by the side of the bed itself. This works very well - - they don't move around, they don't get beat up & smashed/bent, and they are easy to access by just lifting the mattress and reaching in.

Dinette Cabinet

We wrestled with different ideas for the dinette cabinet, and decided to go with this simple, non-destructive approach for a while. We bought these simple folding/stacking shelves that have lips and sticky dots for keeping things from sliding off them.  


First aid kit and toiletries to the left, miscellaneous 'important stuff' to the right, with an aisle between for taller items.  This system has been working well for us, even after 3 long trips.

Seat Organizer

We were often finding that the dinette table was getting cluttered because we didn't have places for the all the little stuff in our pockets, along with cabin miscellanea.

Yuck!


This thing was a great addition.

Hidden Snaps

The FitRV reminds us that behind every one of these 'buttons' lies a snap that can be used for storage or modification. Also, the screw head that the snap/button is trying to hide usually is a fastener for a panel that you may want to open and check behind.


Headliner Shelf

I installed RB Components' "Sprinter Headliner Shelf" in our Revel, and have attached some annotated pictures of before & after. It's available on Amazon as a prime item (free shipping!), and arrived in good shape. However, one bolt was missing (possibly due to shipping), and the instructions are very poor (almost non-existent, didn't like that at all). It took me about two hours to install, is technically very easy (two torx screwdrivers and a ratchet set), but is awkward to lift and tighten into place without a 2nd person at a few key moments. 


It offers a crazy amount of additional storage space - - it stores all of our privacy screens, sleeping bags, coats, blankets, owner's manuals, etc. Note that it requires the removal/loss of the little plastic shelves that Mercedes installed in the vehicle - - if you want to keep those, then RB Components makes a "Raised Headliner Shelf" that preserves those shelves, but cuts the storage in half (approx). Since compartments and cabinets in the Revel are in short supply, we opted to maximize the storage and chose the larger shelf.


Lots of wasted space, IMHO. However, it does allow you to stand upright when exiting the front seats.
Amazon Prime saved about $150 in shipping.


I was bummed that I scratched the headliner getting it into place. It's awkward and heavy, get a buddy for a few key moments.

Won't be needing these anymore, but hated to give them up. If you want to keep these, then get the 'Raised Headliner Shelf', but you'll have about half of the storage.

You don't notice the difference in headroom as a driver or passenger, and the audio system sounds better. 

There is a risk of cracking your forehead, though, so I looked at a million different products, including swimming pool noodles and pipe insulation, and came up with this. It fits well, provides great padding, and easily fastens to the edge of the shelf with double-sided tape.

I think that road noise has increased a bit, though, so during a trip, we grabbed an old Indian blanket that we had sitting around and wrapped it around the shelf on a whim. It helps with high frequency noise.

Turns out that it grew on us, though, so now it seems to be a semi-permanent part of the van.