Stable Table

Jim from San Diego improved the stability of the Revel's dinette table. Here's what he did:


Van builds may vary, but my table simply wasn’t stable enough to please me.  There’s a small bracket at the bottom that’s attached very well to the van wall and floor.  There’s a big bracket at the top that’s poorly attached.  There were only 2 medium sized screws (.190 thread dia.) holding the top bracket to the van wall and one of mine had already pulled loose. 


Next step was to remove the table assembly and watch some YouTube to find out how this thing SHOULD be attached to the van. The van metal behind the trim panels looks like the blue area below:


Decided to attach the table to the side of the van using #12 sheet metal screws.  These require .225 diameter thread clearance holes in the brackets and .125 dia pilot holes in the van. 


Drill work required on the upper bracket:


New bracket, .125 thick aluminum folded around the back of the table assembly.  Purpose of the new bracket it to pick up those 3 new van attachments AND to provide something solid for the bottom of the upper bracket (second key to solidifying the table).

This took me most of the day but “should” be a small project for anyone doing it the second time….

Wheel & Tire Selection

Jim in San Diego writes the following:

Wheel selection is personal.  I went with the stock steel wheels because I like the tough, simple look and the 16” diameter.  The smaller wheel diameter allows for a taller tire that’s somewhat better off-road.  The problem is the stock wheels come with pedestrian tires.


Tire selection is personal.  I went with BFG K02’s for a couple reasons.  First, it seems like every time a spotted a tire I really respected it turned out to be a K02 attached to a seriously capable rig.  Second, after reading way too many reviews, I concluded it was a well-mannered tire on the road where it would do most of its work.  Then I decided to go bigger. 

Tire size is easy: go as big as you can.  This is a huge van that deserves the largest tires you can give it.  I was only able to give mine 1.2” in extra diameter and .7” in extra width because that’s all that will fit without lifting the van and/or modifying wheel wells.  On the stock wheel (16 x 6.5) this was 265/16R16’s.  On the upgraded wheels you can get the same diameter and width with 265/70R17’s.  These were installed on the way home from picking up the Revel.  The new tires are 2000% grippier on rock, mud, sand or anything else.  (I couldn’t find any scientific studies to back up that 2000% gain so I went with my personal conservative estimate…)  And they look good!

Also, these tires fit in the spare tire rack without modifying the rack.  Tight?  Yes. 

A plug for Discount Tires: "The book” at Discount Tire shows the minimum wheel diameter for these tires to be 6.5”.  Some places (all others?) have a 7” minimum.  Discount Tires also gave me $50 each trade in on the old pedestrian tires.  

Decal Removal

We decided that we wanted the van to look more like a simple van and less like an RV. The obvious step to take here is to remove the decals, so we did.

There are a million videos on YouTube about taking decals off cars, so I'll just say that my technique was to get a 1000 watt heat gun, and then heat each letter for about 5 seconds from about 6-8 inches away. Then I just used my fingers and exercised a bit of patience. It took about 90 minutes to remove every single sticker and decal from the van.

These decals came off the easiest, and left very little adhesive behind.


These were the hardest, and frequently fragmented under my fingers. Heat was more useful here.


I briefly paused and considered this, imagining that perhaps I had found the van's new name. But then I forged ahead.


I used this stuff (without gloves) for removing what little adhesive was left behind. For about 2 hours after using this stuff, my face was flushed, and I felt a little woozy. There are no warnings about this on the label, but I'd recommend wearing gloves if you're going to use this. (The scraper utensil was never used, fingers only for my van.)


Death Valley's dust showed me that some of the adhesive is pretty stubborn.


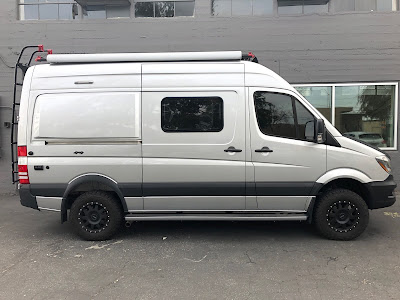
A silver Revel with absolutely no stickers or decals.


And from the rear.


Organizational System for Our Gear

The Revel doesn't have much built-in storage, and we like to stay very organized in a small van, or things get chaotic and unworkable very quickly. In other words, we're 'everything must have its place' people. Here is what we've done to keep ourselves organized -- this is basically how we roll after fine-tuning it for a few months.

We are not adventure sports people (although we admire them!), so we don't have climbing gear, kayaks, etc. Instead, we do 'backroad/offroad touring', usually with our bikes on a rack behind us, and our gear reflects that. This is basically how we make camp every night (scene from breakfast at Joshua Tree in January): zero-gravity chairs for campfires and star-gazing, and a folding table for meals and miscellanea.


We keep the bedding on the bed, and just raise the bed everyday so that we have access to the garage, and the bedding stays clean and tidy. 


All of our gear is organized into tubs. From left to right: 

  • Lower left grey tub is for the water resupply, like water hose and filter, gravity pour spout, funnel, water bandit, etc. 
  • Upper left grey tub is for pantry and household sundry overflow, like garbage bags, extra paper towels, ziplocs, laundry soap, extra boxed/bagged food.
  • Lower blue tub in the middle is power cord, large toolset, jumper cables, emergency equipment, extension cords; 
  • Upper blue tub in the middle is footwear: boots, shoes, flip flops; 
  • Black tub is firewood, firestarter, kindling, hatchet, gloves, marshmallow forks for smores, and other campfire stuff;
  • Lynx Levelers and Dustbuster (it has found a home since this picture was taken);
  • Outdoor zero-gravity chairs and outdoor folding table. 
I have not used a single bungee cord — the carpet in the back keeps everything from slipping. And there are labels on everything, which gives us inner peace, dammit.


Looking at the back row of garage:

  • On the right we have two grey tubs that serve as our 'clothes closets'; these are his & hers tubs, and they hold about 10 days worth of clothes in an organized fashion.
  • Just above them is a tub full of full water jugs for drinking; until we’ve had a chance to sanitize and install a water filter on the line, we are carrying drinking water. This is not sustainable, and we will not keep buying/hauling jugs of water in the near future.
  • On the left is the cargo net, which holds all of our exercise equipment for daily exercise: yoga mat, weights, resistance bands, tarp for outside exercise, and small ball.


Wind Fairing

Due to the aerodynamics of the van and the rack system, and given the pressure on the solar panels, I decided to install the 52" Yakima Wind Fairing to our roof rack.

It all went well until I got to the farthest strap on the passenger side because the strap's buckle was colliding with the rack's knob.


I trimmed the buckle off with some wirecutters.


All done. I'm not a mechanical engineer and can't say for sure that it really helps, but common sense says that it will help to shunt some of the pressure above the rack, and that's a good thing.

Nightstand Pockets

We've really missed having some sort of 'nightstand' on either side of the bed for all the normal stuff: kindles, chapstick, kleenex, etc. 

We decided to install some sort of cargo pockets on the wall above the bed, and decided that it should have a rigid frame, no adhesive, and accommodate enough stuff without ripping out of the wall. I found these things on Amazon, and they came to us from Germany (took a couple of weeks to receive them).


I was extremely concerned about putting holes in the wall near the flares, because the flares are made of fiberglass. Also, it was unclear to me if the plastic 'shell' that surround the whole garage would be strong enough to hold screws & weight.  After taking some measurements of the plastic and the fiberglass, I settled on these screws, and they worked perfectly, staying away from the fiberglass. If you do this, I highly recommend these screws (7x1/2" flathead), but don't over-tighten them, or you'll lose your grip in the plastic!


The pockets work very well, and are rock-solid, no danger of them falling off the wall at all.


2020 Update


This system continues to work well, but we added yet more storage with this pocket, ideal for holding iPads and similar. Once again, I used simple screws in the plastic walls, and there have been no problems at all with it.


Window Rattle!

The window on the sliding door of the first 2018 Revels is notorious for irritating rattles. Winnebago apparently has a fix for this, and is shipping new vehicles with that fix, but since mine is one of the earliest ones, I needed to take matters into my own hands.

The primary, most irritating rattle is due to this silver flexible magnet. It is a little loose in the privacy screen (top and bottom), and chatters as you roll down the road. I used my fingers to pull the magnet out of the channel - - it remained anchored on each end, and I didn't mess with that.


Without doing much research, I used this stuff, and cut a small hole on the application tip so I could get a small stream of glue coming out. 


I just filled the channel up with the glue, and didn't worry too much about overflow - - it cleaned up very easily. I can confirm that it killed the rattle DEAD.


USB Ports

We wanted some more USB ports in the cockpit for charging our phones while going down the road, so we decided to install two more high-speed (higher voltage) USB ports near the floor console for convenience.

Hood Wrap

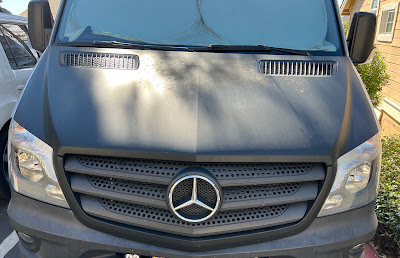
With some trepidation, we decided to wrap the hood with Avery Supreme Black Matte wrap. It’s not a perfect match with the bumpers, but very darned close.

Hood wrap and tinting done by SS Customs: http://www.sscamerica.com/
If you're in the SF Bay Area, check these guys out - - they're like Mecca for custom wrapping in Silicon Valley, doing chrome Lamborghinis, matte black Teslas, colorful Sprinters for Google, etc.


The hood wrap has elicited a funny response: men love it and take pictures and say it looks "bad-ass", and women (e.g. my wife) seem to think it looks too aggressive/macho. (She may be right...)


In my mind, the wrap quickly transitioned it into a bit more of a sporty-looking adventure vehicle. YMMV...


UPDATE 2022


After 4 years of sun & abuse, the wrap had started to decompose due to ultraviolet light, according to a wrap shop guy. You san see this in the middle of the hood in the picture below.


I was told that it would only get worse, and become increasingly difficult to remove, so after about a year of procrastination, I finally got out the heat gun and started peeling it back. 


To my surprise & dismay, the areas that appeared to be composing from ultraviolet light also show a discoloration in the paint directly below them. I'm not sure what to make of it, but I guess that it will call for another wrap...


Spring 2018, 01-March-2022

Window Tinting

The Sprinter has big windows, and people in the front seats can really get blasted by the sun. As a result, we decided to tint the front side windows, especially due to all the UV we were absorbing. Here is the ‘before’ picture.


Here is the ‘after’ picture. It’s a good match with the Dometic windows, perhaps better than this picture would indicate. We used SolarGard Supreme High Performance 20% tint, which blocks 99% of UV-A and UV-B, and has about a 35% heat reduction. The funny thing is that the windows don’t seem particularly dark or tinted from inside the vehicle, so I think it was successful. (Note: different states have different laws on this, and in California, we may be in violation of the code. Something to keep in mind...) 


Bedding

The Revel's bed is an unusual size and shape, and it posed a challenge for sheets. Here's what we did.

(We refer to the two stationary pieces of the bed as 'bolsters', perhaps incorrectly, but that's what I'll call them here.) We found that these body pillowcases are a close match for the size of the bolsters.


I cut 5 small holes on the underside of the pillowcase so that the bolster’s snaps can poke through, and then just snap the bolster down. Works great, fast and easy to remove for washing, and only a little bit of extra cloth hangs down. I may try to address the extra cloth if it becomes a nuisance, but so far, it’s not an issue.


We found an unusual fitted sheet on Amazon for the Revel’s mattress. It fits the width perfectly, but has a little bit of extra length that we tuck under the mattress. It’s called a 3/4 sheet or a small double, and it was shipped from India, so it took a week or two to arrive.


Additional 12v Port

We always use a Garmin GPS as our primary device, so it dawned on me that its power supply should be up on the dash, rather than hanging a cable down to the ashtray. So we installed a new 12v receptacle here, which is almost exactly where Mercedes installs them on the passenger vans.

Audio System Part 2

After upgrading the amplifier, speakers, and subwoofer, as detailed here, we decided it was time for speakers in the back.

We went with these mid-grade Focals for about 1/3 the price of the pair that we put in the front, and they sound great. We spray-painted the grills to match the interior, and they came out pretty well. We also added plenty of Dynamat in the doors for sound insulation and vibration-deadening.


To get the speaker wires from the amplifier in the base of the passenger seat to the rear doors, we elected to go under the van. We dropped the wires from the amplifier under the passenger seat to the undercarriage through an existing grommet. Then we ziptied the wires to the frame, shown here. I didn’t do the zipties, and as I look at this now, I think I’ll redo it and use stronger zipties. Sigh. (Note that others have simply run the wires inside the cabin, through the galley cabinetry, etc. This is ideal, but seemed onerous and lengthy to us, so we went with this approach.)


In the rear corners of the van, we drilled small holes into the bottom of the tail light housing, and the wires entered the body of the van there.


After the wires were in the taillight housing, we simply ran them through the rubber conduit that you see here. At this point, the wires are in the doors, and we pulled them up to the speakers to finish the job. It took about 4 hours to install and wire the rear speakers.

Paper Towels

It was inevitable, ugly but convenient. 


And by the way, if you don't know about these things, you should check them out. It's like having a roll of rags, good for serious clean-up that normal paper towels tremble in fear of. We keep a roll on hand in the van at all times.

Toilet Miscellanea

Gosh, we really LOVE the cassette toilet in the Revel, seriously. It's so incredibly convenient and easy to empty it in any toilet (pit toilets, campground bathrooms, etc), and is not icky at all. I empty it every morning, then rinse it out using the back garden hose, and put half a liter of water and some non-toxic chemical treatment in it for the next day.

We've been using this eco-friendly chemical treatment for our cassette toilet, which is made by Thetford, the manufacturer of the Revel's toilet. We have a URINE-ONLY (and no paper) cassette, so it works extremely well for that. The pouch can be stored exactly where you see it here, and not inside the passenger compartment. We previously used the green stuff in the little bottle next to it, and that worked well, but prefer the pre-measured approach of these little pouches.


Pro-tip: when removing the cassette, you do not want to see the gap and/or black gasket here. If you do, the 'blade' is not closed completely, and you will have a leak when you turn the cassette upright. For some reason, this keeps happening to us (the blade doesn't close all the way), and I had to learn this the hard way.


This is how it should look.

Privacy Screen Alternatives

The shades that ship with the Revel (black bag on left) are very nice, and provide excellent insulation for cold-weather camping. However, they are big, thick, heavy, cumbersome, and the windshield shade in particular is somewhat of a bear to wrestle with. They also take up a fair amount of storage space, and weigh about 10 pounds or so. It may be perfect for winter, but do I really want to carry such a big, bulky screen for the other 3 seasons?

While looking for a substitute windshield shade that is smaller, lighter, and quick to install, I came upon this $14 silver gem on Amazon. So much smaller and lighter (frisbee-sized, about 4 ounces), but provides no insulation. So maybe it’s a 3-season shade...


It installs in about 5-10 seconds, and is almost totally opaque when viewed at night.

$14 on Amazon.


Basically a perfect fit. We may put a few little velcro spots up in the corners, but otherwise, instant privacy that can be stored in a little pocket. Kind of loving it.


If this is coupled with the Remis privacy screens for driver and passenger (see http://a.co/fjYDAV6), then we may have an extremely fast and almost zero-storage privacy solution for the Revel. 


Update 2020

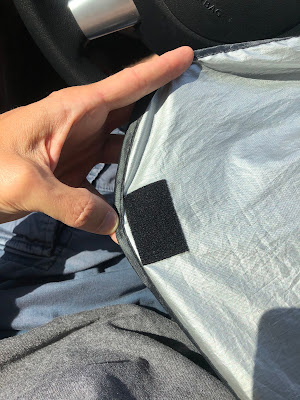
I've found over the past 18 months that this is much easier for one person to use if you put a small patch of velcro in the upper corners of the windshield and on the shade itself. Just attach the upper corners with velcro, then pull the visors down and adjust appropriately. I used VHB tape on the plastic trim to ensure that the velcro isn't going anywhere.